Wednesday, August 26, 2020

SSS Monday Challenge - Beautiful Botanicals, Beautiful Bones Series - Card One

Update 10/17/20:  I have decided to start a series of cards I am calling Beautiful Bones.  I don't know how often I will add to this series, or how many cards it will contain, but I already have ideas for more.  I am in love with Tim Holtz Stampers Anonymous stamp sets that contain a variety of bone and skeleton stamps.  I really enjoy stamping them out in black ink on white cardstock, and then coloring flower stamps to adorn the bones.

Original Post:

Hi All!  Today I am sharing a card I made for Simon Says Stamp Monday Challenge - Beautiful Botanicals.  As I wait for my new Tim Holtz stamps, I couldn't help but break out the Weird Science stamp set from last year!


I started this card by cutting an A2 size piece of white card stock.  I used the largest die from the My Favorite Things Stitched Rectangle Frames die set to cut the black glitter frame.  The glitter is subtle and difficult to see in the pictures.  I then placed the frame onto the white card stock, without attaching it, to get the alignment I wanted for the ribs stamp.  I removed the frame and stamped the ribs in black pigment ink.  I then attached the black frame to the white card stock with thin foam tape.  

Next, I stamped the cluster of flowers from SSS Look for the Rainbows stamp set, and one of the butterflies from SSS Beautiful Butterflies stamp set.  I stamped two of the same butterfly, so I could attach one on top of the other with the wings bent up, for a fluttering look!  I colored the flowers and butterflies with Copic markers, cut them out with their coordinating dies, and adhered them to the card with foam tape.


Copic Colors used for Flowers:
  • RV10, RV13, RV14, RV25
  • V01, V12, V04, V17
  • Y000, Y02, Y08, Y17
Leaves:
  • YG01, YG03, YG17
  • G21, G24, G94
Butterfly:
  • Y08, Y17, YR04, YR16, YR07, YR09
  • Body - N8

I finished off this card by adding a little glitter, glossy accents, and a few iridescent crystals for some bling!  Thank you and I hope you enjoyed my card today!

Tuesday, August 25, 2020

House Mouse Designs - Peony Song

Hello everyone!  Today I am sharing a card I created for the House Mouse and Friends Monday Challenge #322 - Anything Goes with the option of Flowers.  I have wanted to color this stamp for so long that when I saw the flower option I knew exactly which stamp I was going to use!

I started by die cutting the largest of the Wrapped Stitch Rectangles from Memory Box out of Copic friendly white paper.  I then stamped the gorgeous House Mouse Designs stamp, Peony Song featuring Monica, Maxwell, and Mudpie, onto the paper and colored it with Copic markers.  I didn't do anything for a background for this card because the stamp is big and beautiful, and I wanted to let it shine as the focal point!  After I finished coloring, I mounted my card on glitter card stock which actually measures 5 3/4" by 4 1/2".  


Copic Colors used for Peony:

  • R000, R00, R11, R20, R22
  • Y11, Y13, Y15, Y26
  • YG01, YG61, YG63, YG67
Monica:
  • Fur - T1, T3, T5
  • Skin - E50, E51
  • Ears, Nose, Cheeks - E93
Maxwell:
  • Fur - E31, E33, E35
  • Skin - E50, E51
  • Ears, Nose, Cheeks - E93
Mudpie:
  • Fur - E21, E23, E25
  • Skin - E50, E51
  • Ears, Nose, Cheeks - E93
Grass:
  • YG01, YG03, YG17
Raindrops:
  • B0000, B00, B01

For finishing touches on this card I added glitter and glossy accents to the center of the peony and the raindrops.  I added glossy accents to the cute little noses of the mice, and a few raindrop crystals as well.  Thank you and I hope you enjoyed my card today!

Sunday, August 23, 2020

Newton Celebrates!

 Hi All!  Today I am sharing a Newton party scene I made for Newton's Nook Designs Inky Paws Challenge #130 - Create a Scene, and my parent's Anniversary.  I colored all of the Newtons to resemble their kitties.  They have four, so one is going inside the card!

I started this card off by creating the background.  I used purple tape to mask off the top portion of the card and inked up the floor with Antique Linen Distress Oxide Ink.  I then used Newton's Nook Designs Hardwood stencil with Vintage Photo.  I removed the purple tape from the top portion of the card and masked off my floor.  I used Distress Oxide Inks Spun Sugar and Shaded Lilac for the top portion of the background.  I then used NND Confetti stencil with Worn Lipstick and Wilted Violet. 

Next, I stamped out the super cute images from Newton Celebrates and Newton's New Year stamp sets.  I also used a party hat from the Newton Loves Cake stamp set.  I colored them with Copic markers and cut them out with their coordinating dies.  I used a sentiment from NND Birthday Roundabout stamp set, and a banner from NND Banner Trio die set.  I gold heat embossed the sentiment then rubbed the embossing ink pad along the edges, dipping them into the embossing powder as well.  I love the look of the gold heat embossed edges!  I attached all of the images to the background with liquid glue and foam tape for dimension!


Copic Colors used for Orange Newton:
  • Y35, Y17, YR15, YR16 - stripes
  • Belly - Y19, Y17, YR15
  • Ears - R20, R32, R43
  • Nose - R20
  • Hat - B00, B01, B02
    • YG01, YG03, YG06
  • Glass - B000, B00
  • Martini - B000, B00, B01, B02, B04
  • Olive - G21, G24, G94, G99
    • R05, R46, R39
Gray Newton:
  • C0, C1, C2, C3 - stripes
  • Belly - C0, C1
  • Ears - R00, R11, R20 
  • Nose - R00
Pup:
  • E50, E51, E53
  • Belly - N0, N1
  • Nose - R11, R20
  • Collar - V12, V04, FV2
Champagne Bottle:
  • YG01, YG03, YG06, YG17
  • Y11, Y13, Y15, Y19
  • C3, C5, C7
  • R05, R24, R46, R39
  • Champagne - Y0000, Y00, Y02
Buff Newton:
  • YR0000, YR000, YR20, YR31 - stripes
  • Ears - R20, R32, R43
  • Nose - R20
  • Collar - B00, B01, B02
  • Hat - B00, B01, B02
    • YG01, YG03, YG06
  • Glass - B000, B00
  • Champagne - Y0000, Y00, Y02

For finishing touches on this card I added glitter with a glitter pen, glossy accents, and a few crystals for some bling!  Thank you and I hope you enjoyed my card today!

Wednesday, August 19, 2020

Happy Little Hello Square Card

 Hi everyone!  Today I am sharing a card I created for Newton's Nook Designs Inky Paws Challenge #130 - Create a Scene, and Simon Says Stamp Wednesday Challenge - Oh So Cute!

I started by die cutting the two stitched squares from Newton's Nook Designs Frames Squared die set. On the larger square, I created the plaid background with NND Plaid stencil set.  I used Squeezed Lemonade Distress Ink with Layer 1, and Spun Sugar Distress Ink with Layer 2.  For the scene background, I used NND Clouds stencil with Distress Oxide Inks Salty Ocean and Tumbled Glass.  Next, I die cut the grass with NND Land Borders die, and the sun with NND Sky Scene Builder.  I used Distress Oxide Inks Twisted Citron and Mowed Lawn on the grass, and Squeezed Lemonade, Mustard Seed, and Spiced Marmalade on the sun.  

After completing my background pieces, I stamped the adorable hedgehog and ladybug images from the now retired, Hedgehog Hollow stamp set.  The mushrooms are from the same set, and the butterflies are from Newton's Birdbath stamp set.  After coloring all of my images with Copic markers, I cut them out with their coordinating dies.  Next, I stamped the sentiment with black pigment ink and clear heat embossed it for a shiny look!  I then attached all of my pieces together with liquid glue and foam tape.  


Copic Colors used for the Hedgehog:

  • E50, E51, E53, E11
  • E13, E15, E18
  • Ears - R20, R32
  • Nose - R20
  • Cheeks - E93
Ladybugs:
  • R05, R24, R46, R39
  • C3, C5, C7
Mushrooms:
  • E40, E41, E42, E43
  • Pink - RV10, RV21, RV23, RV25
  • Yellow - Y00, Y02, Y06, Y08, Y35, Y17
Butterflies:
  • Body - E11, E15
  • Pink - RV10, RV21, RV23, RV25
  • Yellow - Y00, Y02, Y06, Y08

To finish off this card I added glitter for some sparkle and glossy accents for some shine!  Thank you and I hope you enjoyed my card today!


Tuesday, August 18, 2020

SSS Wednesday Challenge - Midsummer Blues

 Hi All!  Today I am sharing a card I made for the Simon Says Stamp Wednesday Challenge - Midsummer Blues.  I just love the way Distress Oxide blues blend together.  They are so vibrant and beautiful!

For the background on this card I blended together Distress Oxide Inks Tumbled Glass, Salty Ocean, and Blueprint Sketch.  I then added a tiny bit of water to some white gouache and flicked it onto the background.  Setting my background aside to dry, I die cut the largest frame from the Memory Box Stylish Rectangle Trio three times, twice with white card stock and once with white glitter card stock.  I used liquid glue to adhere the three layers together.  I repeated the same process with the SSS Floral Bundle die, and attached both to my card base with liquid glue.  

I die cut the SSS Big Thanks sentiment out of aqua glitter card stock and the shadow out of vellum.  I used foam tape to pop the sentiment up for some dimension!


I finished off this card by adding a few raindrop crystals.  This card was fast and easy to make, and came out beautifully with the vibrant blues and sparkle card stock!  Thank you and I hope you enjoyed my card today!

Monday, August 17, 2020

MFT Wednesday Sketch Challenge - Sketch 502

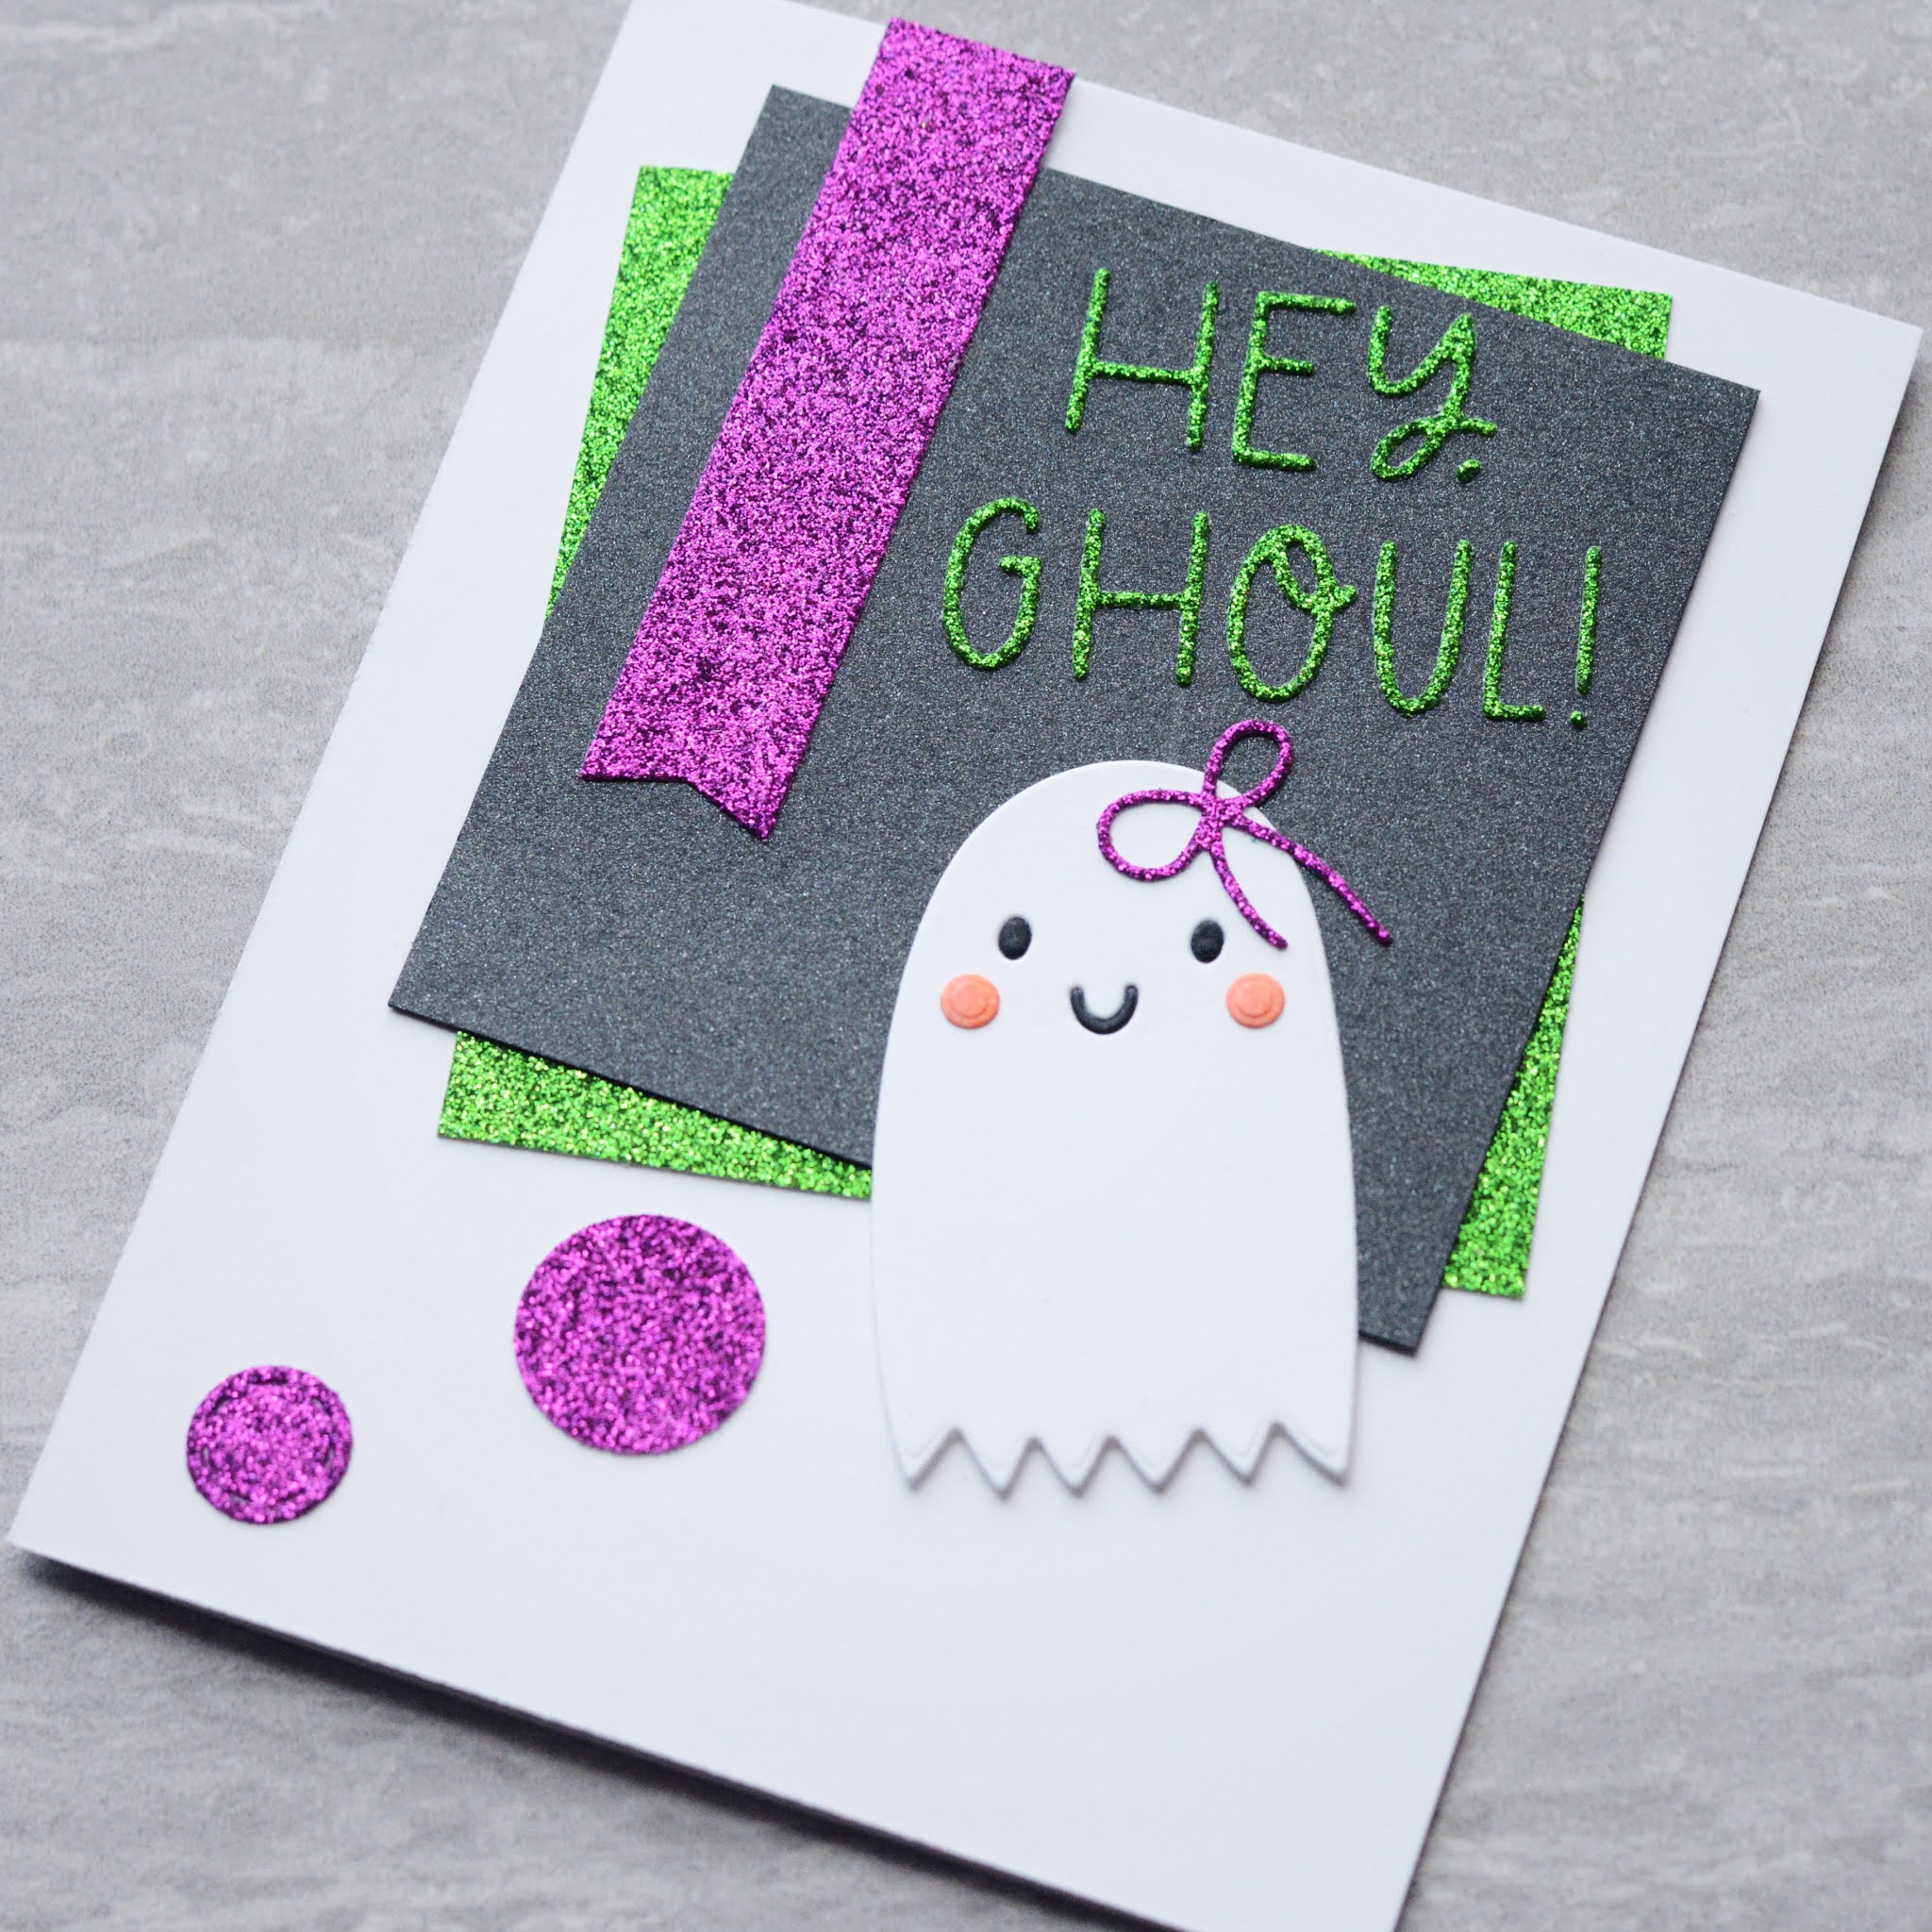
 Hello everyone!  Today I am sharing a card I created for My Favorite Things Sketch Challenge - Sketch 502.  Did you see the new Hey, Ghoul Die-namics?  It is adorable and I had to use it!


I started by cutting black shimmer card stock and green glitter card stock into 3 1/4" x 3 1/4" squares, off-setting them, and attaching them to my card base with liquid glue.  I die cut my ghost with the new MFT Hey, Ghoul Die-namics, and colored her cheeks, eyes, and mouth with Copic markers.  For her cheeks I used E93 and R20, and for her eyes and mouth I used C8.  I used the green glitter card stock for my sentiment and attached it with liquid glue.  I then die cut a purple glitter banner using one of the banners from the MFT Starburst Sentiment Strips.  I used the same purple glitter card stock to die cut two circles, and the bow for my adorable ghost!  


This card was easy and fun to make!  I just love the super cute ghost!  Thank you and I hope you enjoyed my card today!  

Wednesday, August 12, 2020

Newton's Summer Treats Slimline Card

 Hello everyone!  Today I am sharing another card I made for Newton's Nook Designs Inky Paws Challenge #129 - Sketch Challenge.  


I started with the background by blending Distress Oxide Ink colors Squeezed Lemonade, Spun Sugar, and Shaded Lilac.  I then used Newton's Nook Designs Bubbly stencil with Mustard Seed, Worn Lipstick, and Wilted Violet.  Next, I die cut my ink blended panel with the scalloped edge die, and die cut a piece of off-white glitter card stock with the portholes die, both from NND Slimline Frames and Portholes die set.  I attached my ink blended panel to off-white glitter card stock with liquid glue, and attached my portholes panel to my ink blended panel with foam tape for some dimension! 

With the background complete, I stamped out the super cute images of Newton enjoying ice cream from the Newton's Summer Treats stamp set.  I colored the images with Copic markers and die cut them out with the coordinating die set.  After figuring out the placement of each Newton, I stamped the sentiments with black pigment ink, and adhered the images with foam tape and liquid glue.  


Copic Colors used for Buff Newton:
  • YR0000, YR000, YR20, YR31 - stripes 
  • Ears - R20, R32, R43
  • Nose - R32
Gray Spotted Newton:
  • W0, W1, W2, W4, W6
  • Ears, Tongue, and Beans - R20, R32, R43
  • Nose - R20
Orange Spotted Newton:
  • Y35, Y17, YR15, YR16, N0, N1
  • Ears - R00, R11, R20
  • Nose - R11
Gray Striped Newton:
  • C0, C1, C2, C3 - stripes
  • Ears - R00, R11, R20
  • Nose - R00
Other color combinations used:
  • V000, V01, V04
  • RV10, RV21, RV23
  • R05, R24, R27, R46
  • Y000, Y02, Y06, Y08
  • Y21, Y23, Y26
  • G0000, G000, G00, G02
  • BG11, BG23, BG13, BG15
  • B0000, B00, B01
  • B02, B04, B06
  • E33, E35, E37, E39

To finish off the card I added glitter and glossy accents for some sparkle and shine!  I also added a few color coordinating crystals for even more sparkle!  Thank you and I hope you enjoyed my card today!