Wednesday, June 30, 2021

House Mouse Santa Mouse Tags

 Hi everyone!  Today I am sharing two tags I created for House Mouse and Friends Monday Challenge #343 - Anything Goes with the option of Make it Small.  Tags are perfect for this challenge, and why not get started on Christmas tags?


For these tags I used the largest die in Sunny Studio's Scalloped Tag Circle die set to cut out my glitter bases.  I used one of the smooth circle dies in the Paper Artist 8 Circles & Scallops die set from Hot Off the Press to cut out white Copic friendly circles.  

Next, I stamped the super cute image of Maxwell as Santa on both circles, and colored them with Copic markers.  I stamped the "to: from:" stamp from Newton's Nook Designs Jolly Tags stamp set, and adhered each circle to my glitter bases with liquid glue.

I used Tim Holtz idea-ology Christmas Velvet Trims for the ribbon, White Blizzard Nuvo glitter drops for the Santa hat rim, and a little white pom-pom for the hat tassel!  


Copic colors use on Maxwell:
  • Fur - E31, E33, E35
  • Skin - E50, E51
  • Ears, Cheeks, Nose - E93
Red:
  • R05, R27, R46, R39
Green:
  • YG01, YG06, YG09
Shadows:
  • T0, T1, T2, T3

To finish up these tags I added glossy accents to Maxwell's nose, and a few sparkling sequins!  Thank you and I hope you enjoyed my post today!

Monday, June 28, 2021

Inky Paws Challenge #151 - Summer Theme Reminder

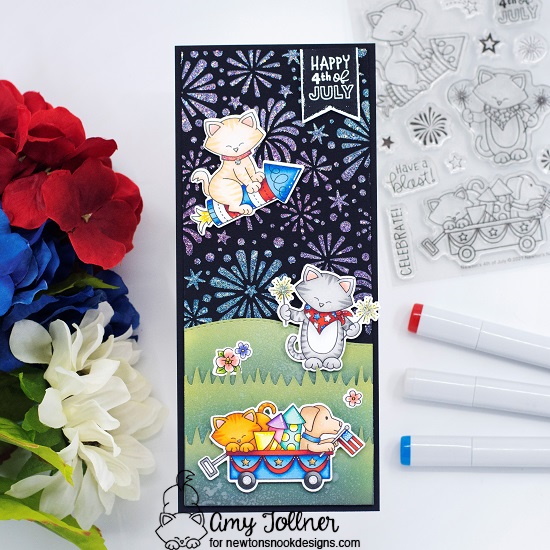
 Hi everybody!  This is an Inky Paws Challenge #151 - Summer Theme reminder post!  You have until Friday, July 2nd to get your entries in for a chance to win a $20 store credit to Newton's Nook Designs online shop!  Don't you LOVE Newton's Nook latest release?  I just had to use the awesome 4th of July stamp set for this card!

Newton's Nook Designs Inky Paws Challenge - Summer Theme

Inky Paws Challenge Summer Theme - Newton's 4th of July stamp and die set, Woodland Spring stamp and die set, Fireworks stencil, Land Borders die set, Frames and Flags die set by Newton's Nook Designs #newtonsnook #handmade

To start this card I cut a piece of black cardstock to 8 1/4" x 3 1/4".  I used the new Fireworks stencil with Distress Oxide Inks Picked Raspberry, Wilted Violet, and Peacock Feathers.  The Picked Raspberry and Wilted Violet ended up looking very similar on the finished card.  I left the stencil in place and applied glitter paste over the ink for a super sparkly look!  

I set my fireworks background aside to dry and used the Land Borders die set to cut out the grass, on which I blended Distress Oxide Inks Peeled Paint, Rustic Wilderness, and Black Soot.  I then sprayed it with some Silver Shimmer Spritz, and set my grass pieces aside to dry as well.  

Next, I stamped out the absolutely adorable images from Newton's 4th of July stamp set, and a few flowers from the Woodland Spring stamp set, and colored them with Copic markers.  I cut the Newton images out with Newton's 4th of July die set, and the flowers with the Woodland Spring die set.  

I used a banner die from the Frames and Flags die set to cut out a piece of black cardstock on which I white heat embossed the sentiment and the edges of the banner.  

After my fireworks background was dry, I adhered it to a black cardbase.  I used liquid glue to adhere the grass and flowers to my card.  I used foam tape to adhere all of the Newton images and the sentiment banner to give them some dimension!

Inky Paws Challenge Summer Theme - Newton's 4th of July stamp and die set, Woodland Spring stamp and die set, Fireworks stencil, Land Borders die set, Frames and Flags die set by Newton's Nook Designs #newtonsnook #handmade

Inky Paws Challenge Summer Theme - Newton's 4th of July stamp and die set, Woodland Spring stamp and die set, Fireworks stencil, Land Borders die set, Frames and Flags die set by Newton's Nook Designs #newtonsnook #handmade

Copic colors used for Firecracker Newton:
  • YR0000, YR000, YR20, YR31 - stripes
  • Ears - R01, R11, R20
  • Nose - R01
Sparkler Newton:
  • T0, T1, T2, T3, T4 - stripes
  • Ears - R01, R11, R20
  • Nose - R01
  • Belly - T0, T1
Wagon Newton:
  • Y35, Y17, YR15, YR18, YR16 - stripes
  • Ears - R01, R11, R20
  • Nose - R11
Pup:
  • E50, E51, E53, E11
  • Nose - R11
Firecrackers in Wagon:
  • BG10, BG11, BG23, BG15
  • Y000, Y02, Y08
  • Y38, YR04, YR07
  • V01, V12, V04, V17
  • RV10, RV13, RV14
Wagon Tires:
  • T0, T1, T2
  • T3, T5, T7
Stars on Wagon:
  • Y23, Y26, Y28
Red:
  • R05, R24, R46, R39
White:
  • T0, T1, T2
Blue:
  • B12, B14, B16, B18
Yellow:
  • Y000, Y02, Y08
Flowers:
  • R01, R11, R20, R22
  • BV31, BV02, BV04
  • Centers - Y26, Y28
  • Leaves - YG01, YG03, YG17
Inky Paws Challenge Summer Theme - Newton's 4th of July stamp and die set, Woodland Spring stamp and die set, Fireworks stencil, Land Borders die set, Frames and Flags die set by Newton's Nook Designs #newtonsnook #handmade

To finish off this card I added some glitter with a glitter pen, glossy accents, and silver glitter Stickles for the tag on Firecracker Newton's collar!  Now it's time to get your paws inky creating a Summer Theme project using your Newton's Nook Designs products!  Be sure to link up to the Inky Paws Challenge!  Hope to see you there!

Monday, June 21, 2021

Inky Paws Challenge #151 - Summer Theme

 Hi everybody!  A new Inky Paws Challenge starts today!  You have until Friday, July 2nd to get your entries in and have a chance to win a $20 store credit to Newton's Nook Designs online shop!  This is Inky Paws Challenge #151 - Summer Theme.  I just love this little gnome, and I wanted him to look like he is really enjoying his garden!

Newton's Nook Designs Inky Paws Challenge - Summer Theme

Inky Paws Challenge Summer Theme - Gnome Garden stamp and die set, Woodland Spring stamp and die set, Forest Scene Builder die set, Land Borders die set by Newton's Nook Designs #newtonsnook #handmade

I knew I wanted to make this card a 5" x 7" so I could fit in all of the flowers and critters I wanted to be in the gnome's garden.  I started by cutting a piece of smooth white cardstock to 4 1/2" x 6 1/2", and blended Distress Oxide Inks Antique Linen, Kitsch Flamingo, and Shaded Lilac onto the background.  I then splattered some gold watercolor paint onto the background and set it aside to dry.  

Next, I die cut the trees and birds using the Forest Scene Builder die set, and the grass using the Land Borders die set.  I blotted the trees with Weathered Wood Distress Oxide Ink.  I then blended Twisted Citron, Mowed Lawn, and Rustic Wilderness onto the grass, and splattered it with a bit of water.

I stamped out the super cute gnome sitting on the toadstool from the Gnome Garden stamp set.  I also stamped out the gnome with the wheelbarrow so I could include the wheelbarrow with flowers in my scene.  The ladybug and butterflies are from the Gnome Garden stamp set as well.  I stamped out a few flowers from the Woodland Spring stamp set, and I also stamped the fox image a couple of times because I wanted to use the little bunch of flowers by the fox's tail.  I colored all of the images with Copic markers and cut them out with their coordinating dies from the Gnome Garden die set, and the Woodland Spring die set.  I fussy cut the wheelbarrow, and the two flower clusters.  I used a white gel pen over the ink where the original image overlapped my fussy cut border.  

I stamped the sentiment from the Gnome Garden stamp set on black cardstock and gold heat embossed, fussy cutting around the sentiment.  I decided on a dark Kraft color cardbase and die cut it to 5" x 7", adhering my ink blended background.  I then adhered all of my die cut pieces and images to my background using liquid glue for some elements of my card, and foam tape for others!

Inky Paws Challenge Summer Theme - Gnome Garden stamp and die set, Woodland Spring stamp and die set, Forest Scene Builder die set, Land Borders die set by Newton's Nook Designs #newtonsnook #handmade

Inky Paws Challenge Summer Theme - Gnome Garden stamp and die set, Woodland Spring stamp and die set, Forest Scene Builder die set, Land Borders die set by Newton's Nook Designs #newtonsnook #handmade

Copic colors used for Gnome:
  • Skin - E000, E00, E11
  • Cheeks - R11
  • Beard - N0, N1
  • Hat - BG10, BG11, BG32, BG15, BG49
  • Shirt - BV31, BV02, BV04
    • R11, R20, R22, R14
  • Pants - E70, E71, E74, E77
  • Boots - N3, N5, N7
Toadstool:
  • BG10, BG11, BG32, BG15, BG49
  • N0, N1
  • E40, E41, E42, E43
Flowers:
  • R01, R11, R20, R22
  • BV31, BV02, BV04
  • Y11, Y13, Y15, Y17
Leaves:
  • YG01, YG03, YG17
  • G40, G43, G46
Butterflies:
  • Y11, Y13, Y15, Y17
  • R01, R11, R20, R22
  • Bodies - E11, E15
Ladybug and Cardinal:
  • R05, R24, R46, R39
Bluebirds:
  • B000, B01, B02, B05
Inky Paws Challenge Summer Theme - Gnome Garden stamp and die set, Woodland Spring stamp and die set, Forest Scene Builder die set, Land Borders die set by Newton's Nook Designs #newtonsnook #handmade

For finishing touches on this card I added glitter with a glitter pen and a few glossy accents!  Now it's time to get your paws inky creating a Summer Theme project using your Newton's Nook Designs products!  Be sure to link up to the Inky Paws Challenge!  Hope to see you there!

Wednesday, June 16, 2021

House Mouse Designs Ballerina Baby

 Hi everyone!  Today I am sharing a card I created for House Mouse and Friends Monday Challenge #342 - Anything Goes with the option of a Matching Envelope.  I just love this stamp!  It's so cute!


To start this card I die cut the piece of white cardstock, stamped this adorable image of Amanda, and colored it with Copic markers.  After coloring, I was able to match the patterned paper for the background, and adhered it to a gold glitter cardbase.  I then adhered Amanda's piece to the patterned paper with foam tape for dimension.  I die cut and attached a gold glitter bow, and added the flowers as well.

I was so happy to find a pink envelope that matched my card pretty well!  I stamped the image of Amanda in the bottom right corner with gold pigment ink.  I left the stamp in place in my Misti because I was worried the image would not show up all that well, and after drying, it did not.  I re-stamped it using brown pigment ink.  It came out pretty neat because you can see a little of the gold under the brown!


Copic colors used for Amanda:
  • Fur - E53, E35, E57
  • Skin - E50, E51
  • Ears, Cheeks, Nose - E93
Tutu:
  • RV52, RV63, RV55, RV66
Shadows:
  • T1, T2, T3

For finishing touches on this card I added glitter to Amanda's tutu, and glossy accents to her nose!  Thank you and I hope you enjoyed my card today!

Monday, June 14, 2021

Inky Paws Challenge #150 - Sketch Challenge Reminder

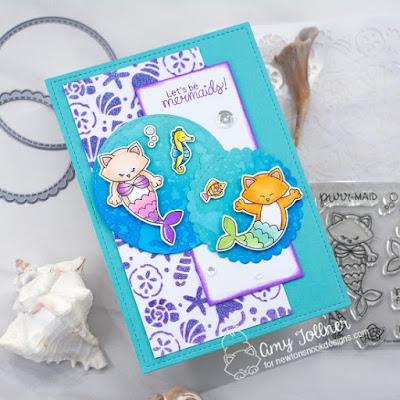
 Hi everybody!  This is an Inky Paws Challenge #150 - Sketch Challenge reminder post!  You have until Friday, June 18th to get your entries in and have a chance to win a $20 store credit to Newton's Nook Designs online shop!  I just love the mermaid tails on these kitties, and it gave me the perfect opportunity to use one of my favorite things - glitter!  What would a mermaid tail be without it?

Newton's Nook Designs Inky Paws Challenge - Sketch Challenge

Inky Paws Challenge Sketch Challenge - Purr-maid Newton stamp and die set, Circle Frames die set, Seashells stencil by Newton's Nook Designs #newtonsnook #handmade

To start this card I die cut a teal cardbase to 5" by 7".  I then cut a piece of smooth white cardstock to 6 1/2" by 3 1/4" on which I used purple glitter paste with the Seashells stencil.  I cut another piece of white cardstock to 5 1/4" by 2 1/4" for the smaller panel.  I used the largest stitched die, and the smallest scalloped die from the Circle Frames die set to cut two circles from smooth white cardstock.  On the circles I blended Distress Oxide Inks Salvaged Patina and Salty Ocean, splattered them with some water, and set them aside to dry.  

Next, I stamped out the super cute Purr-maids, fish, and bubbles from the Purr-maid Newton stamp set.  I colored them with Copic markers and cut them out with their coordinating dies.  

I stamped the sentiment, also from the Purr-maid Newton stamp set, onto the smaller panel in Wilted Violet Distress Oxide Ink, and inked the edges of the panel as well.  I then adhered the panels and circles down to my cardbase, and popped up all of the images with foam tape for some dimension!

Inky Paws Challenge Sketch Challenge - Purr-maid Newton stamp and die set, Circle Frames die set, Seashells stencil by Newton's Nook Designs #newtonsnook #handmade

Inky Paws Challenge Sketch Challenge - Purr-maid Newton stamp and die set, Circle Frames die set, Seashells stencil by Newton's Nook Designs #newtonsnook #handmade

Inky Paws Challenge Sketch Challenge - Purr-maid Newton stamp and die set, Circle Frames die set, Seashells stencil by Newton's Nook Designs #newtonsnook #handmade

Copic colors used for Newton:
  • Y35, Y17, YR15
  • Shadows - T0, T1
  • Ears - R00, R11, R20
  • Nose - R11
  • Cheeks - E93
  • Purr-maid Tail - BG10, BG11, YG11, YG13
Newton's Girlfriend:
  • YR0000, YR00, YR20
  • Shadows - T0, T1
  • Ears - R00, R11, R20
  • Nose - R11
  • Cheeks - E93
  • Purr-maid Tail and Top - RV00, RV02, V12, V04
Seahorse:
  • Y00, Y02, Y08
  • B00, B02, B05
Fish:
  • Y00, Y02, Y08
  • RV00, RV02, RV13
Inky Paws Challenge Sketch Challenge - Purr-maid Newton stamp and die set, Circle Frames die set, Seashells stencil by Newton's Nook Designs #newtonsnook #handmade

To finish off this card I added glitter to their Purr-maid tails and top, I used Unicorn glitter Stickles on the bubbles, glossy accents on their noses, and a few sparkling sequins!  Now it's time to get your paws inky creating a project for the Sketch Challenge using your Newton's Nook Designs products.  Be sure to link up to the Inky Paws Challenge!  Hope to see you there!

Wednesday, June 9, 2021

Time to SHELL-abrate Slimline Card

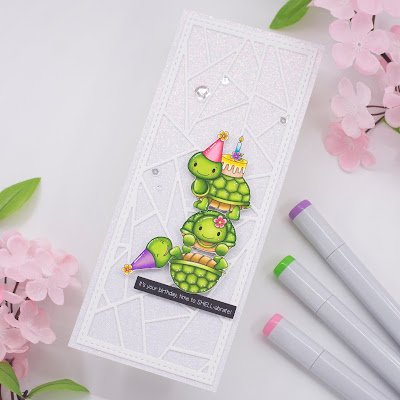
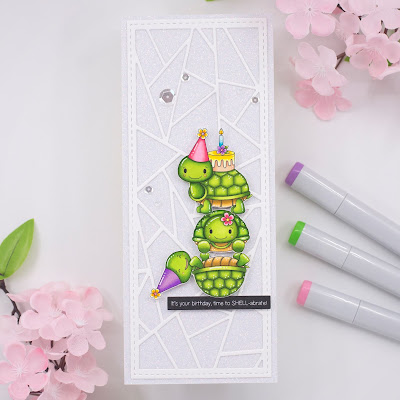
 Hi everyone!  Today I am sharing a card I created using Streamside Studios Turtley Awesome Woodland Friends digi stamp set.  The turtles in this set are so adorable and I couldn't wait to color them!


I knew I wanted to make a little turtle pile for my card and chose my images with that in mind.  I added the party hats to the turtles, and the flower from the Woodland Friends digi stamp set to the middle turtle, before printing them out.  I colored my images with Copic markers and fussy cut them out.  

I cut a piece of white glitter cardstock to 8.5" x 3.5" for my cardbase.  Then I used the Slim Geometric Panel die from Your Next Stamp to cut a piece of white cardstock, and adhered it to my glitter cardbase with liquid glue.  

Next, I used a banner die from My Favorite Things Skinny Strips die set to cut out the sentiment strip.  I adhered the sentiment, and turtle images to my card with foam tape for dimension.   


Copic colors used for Turtles:
  • YG01, YG03, YG17
  • YG01, YG06, YG25, YG17
  • Y21, Y23, Y26, Y28
  • Cheeks - E93
Hats:
  • RV10, RV13, RV14
  • V01, V12, V04
  • Y000, Y06, Y08, Y38
  • V12, V04
  • RV13, RV14
Cake:
  • E30, E21, E11
  • Frosting - Y000, Y02, Y06, Y08
  • Flower - V01, V12, V04
    • R13, R14
    • YG01, YG17
  • Candle - BG000, BG02, BG05
    • Y000, Y08, Y38
Pink Flower:
  • RV10, RV13, RV14
  • Y02, Y08

For finishing touches I added accents with a white gel pen, (which I am practicing!), and a few sparkling sequins!  This card was so much fun to create, and I love the way it came out!  Thank you for stopping by!

Monday, June 7, 2021

Inky Paws Challenge #150 - Sketch Challenge

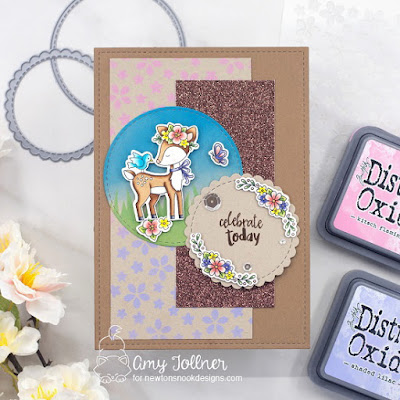
 Hi everyone!  A new Inky Paws Challenge starts today!  This is Inky Paws Challenge #150 - Sketch Challenge.  You have until Friday, June 18th to get your entries in and have a chance to win a $20 store credit to Newton's Nook Designs online shop!  I love the Woodland Spring stamp set.  It is one of my favorites and I just had to use it on this card!

Newton's Nook Designs Inky Paws Challenge - Sketch Challenge
Inky Paws Challenge Sketch Challenge - Woodland Spring stamp and die set, Newton's Picnic stamp and die set, Happy Little Thoughts stamp set, Circle Frames die set, Petite Flowers stencil, Hills and Grass stencil by Newton's Nook Designs #newtonsnook #handmade

Before I started creating this card, I made a template for myself again like I did for the last Sketch Challenge.  It is so helpful to know the measurements for all of the pieces!  I made the cardbase first, die cutting a piece of darker kraft cardstock to 5" by 7".  Next, I cut a piece of kraft cardstock to 6 1/2" by 3 1/4" on which I used Distress Oxide Inks Kitsch Flamingo and Shaded Lilac with the Petite Flowers stencil.  I wanted to get my glitter in there so I cut a piece of chocolate glitter cardstock to 5 1/4" by 2 1/4" for the smaller panel.  I then used the largest stitched die, and the smallest scalloped die from the Circle Frames die set to cut two circles from kraft cardstock.  I knew I wanted to make a little scene on the larger circle, and used Distress Oxide Ink Salty Ocean for the sky, and Mowed Lawn for the grass which I created using the Hills and Grass stencil.  

Next, I stamped out the beautiful deer and flower images from the Woodland Spring stamp set, and the butterfly from Newton's Picnic stamp set.  I colored the images with Copic markers, and cut the deer and flowers out with the Woodland Spring die set, and the butterfly with the Newton's Picnic die set.  

I stamped the sentiment from the Happy Little Thoughts stamp set on the smaller circle with brown pigment ink and clear heat embossed.  I then adhered the panels and circles down to my cardbase, and popped up all of the images with foam tape for some dimension!

Inky Paws Challenge Sketch Challenge - Woodland Spring stamp and die set, Newton's Picnic stamp and die set, Happy Little Thoughts stamp set, Circle Frames die set, Petite Flowers stencil, Hills and Grass stencil by Newton's Nook Designs #newtonsnook #handmade

Inky Paws Challenge Sketch Challenge - Woodland Spring stamp and die set, Newton's Picnic stamp and die set, Happy Little Thoughts stamp set, Circle Frames die set, Petite Flowers stencil, Hills and Grass stencil by Newton's Nook Designs #newtonsnook #handmade

Copic colors used for Deer:
  • E31, E33, E35, E37
  • Shadows - N0, N1
  • Hooves - N3, N5, N7
  • Ear - R01, E93
  • Cheek - R01
  • Bow - BV31, BV01, BV02, BV04
Bird:
  • BG0000, BG01, BG02, BG05
  • Y02, Y08
Flowers:
  • Pink - R11, R20, R22, R14
    • Center - Y23, Y26, Y28
  • Yellow - Y00, Y02, Y08
    • Center - E93
  • Purple - BV31, BV01, BV02, BV04
    • Center - E93
Leaves:
  • YG01, YG03, YG17
  • G40, G43, G46
Berries:
  • E93
Butterfly:
  • BV31, BV02, BV04
  • R01, R11, R20, R22
  • E11, E15
Inky Paws Challenge Sketch Challenge - Woodland Spring stamp and die set, Newton's Picnic stamp and die set, Happy Little Thoughts stamp set, Circle Frames die set, Petite Flowers stencil, Hills and Grass stencil by Newton's Nook Designs #newtonsnook #handmade

For finishing touches on this card I added some glitter with a glitter pen, glossy accents, and a few sparkling sequins!  Now it's time to get your paws inky creating a project for the Sketch Challenge using your Newton's Nook Designs products.  Be sure to link up to the Inky Paws Challenge!  Hope to see you there!

Thursday, June 3, 2021

House Mouse Designs Make a Wish...

 Hi everybody!  Today I am sharing a card I created for House Mouse and Friends Monday Challenge #341 - Anything Goes with the option of Embossing (heat or dry).  


To start this card, I cut a bright yellow cardbase to an A6 size which measures 4 1/2" x 6 1/4".  It's difficult to tell, but I used Sizzix Dandelion Wish embossing folder with white cardstock.  I trimmed it down and adhered it to my cardbase.  

I used Newton's Nook Designs Frames Squared die set to cut the bright yellow scalloped square, and the smaller stitched square on which I stamped this adorable House Mouse image from the Mini Clear Stamp Set.  I stamped the sentiment in black pigment ink and clear heat embossed for some shine!  I then colored the image with Copic markers.  

After adhering all of my layers together, I decided to add the twine and bow.  I am so glad I was able to sneak the edges of the twine under the white embossed layer! 


Copic colors used for Mouse:

  • Fur - E31, E33, E35
  • Skin - E50, E51
  • Nose, Cheek, Ear - E93
Dandelions:
  • Y11, Y13, Y15, Y08
  • Stems - YG01, YG03, YG17
  • Seeds - Y26
Sky:
  • B0000, B000

For a finishing touch on this card I added glitter to the dandelions, and glossy accents to the mouse's cute little nose!  Thank you and I hope you enjoyed my card today!