Monday, July 26, 2021

Inky Paws Challenge #153 - Sketch Challenge Reminder

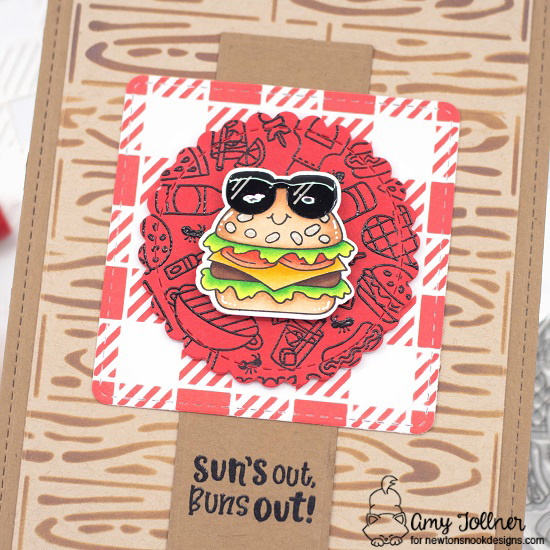
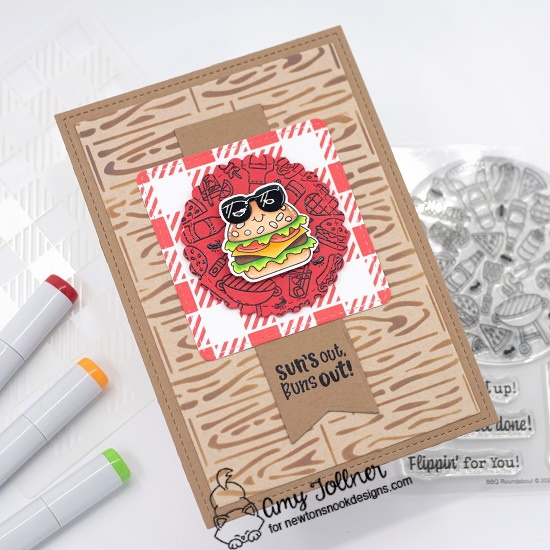
 Hi everyone!  Here is an Inky Paws Challenge Reminder Post!  This is Inky Paws Challenge #153 - Sketch Challenge.  You have until Friday, July 30th to get your entries in and have a chance to win a $20 store credit to Newton's Nook Designs online shop!  The new Buns Out Stamp Set is hilarious, and I am so happy I got to use it on this card!

Newton's Nook Designs Inky Paws Challenge - Sketch Challenge

Inky Paws Sketch Challenge - Buns Out stamp and die set, BBQ Roundabout, Hardwood stencil, Gingham stencil, Frames and Flags die set, Frames Squared die set, Circle Frames die set by Newton's Nook Designs #newtonsnook #handmade

I started this card by die cutting a piece of dark kraft cardstock to 5" by 7" for a cardbase.  I then cut a piece of kraft cardstock to 4 1/2" by 6 1/2", and used the Hardwood Stencil with Distress Oxide Inks Vintage Photo and Walnut Stain to create the background.  

I cut a dark kraft cardstock banner using the largest banner die in the Frames and Flags Die Set.  I cut a smooth white cardstock square using the smallest stitched square die in the Frames Squared Die Set, on which I used the Gingham Stencil with Candied Apple Distress Oxide Ink. I die cut a circle out of red cardstock using the smallest scalloped circle in the Circle Frames Die Set.  I then stamped the BBQ Roundabout on the red scalloped circle with black pigment ink and clear heat embossed. I did the same for the sentiment on the banner as well.  

Inky Paws Sketch Challenge - Buns Out stamp and die set, BBQ Roundabout, Hardwood stencil, Gingham stencil, Frames and Flags die set, Frames Squared die set, Circle Frames die set by Newton's Nook Designs #newtonsnook #handmade

Next, I stamped the super cute Buns Out image, colored him with Copic markers, and cut him out with the coordinating die.  

After I had all of my pieces it was time to assemble this card!  First, I adhered my harwood background to the dark kraft cardbase.  I then cut the banner in half and adhered it to the background so the top and bottom of the banner would be showing from underneath the square piece, which I adhered next on top of the banner.  I used thin foam tape with some liquid glue on it to pop up the scalloped circle, and foam squares to pop up the hamburger and give some more dimension to my card! 

Inky Paws Sketch Challenge - Buns Out stamp and die set, BBQ Roundabout, Hardwood stencil, Gingham stencil, Frames and Flags die set, Frames Squared die set, Circle Frames die set by Newton's Nook Designs #newtonsnook #handmade

Inky Paws Sketch Challenge - Buns Out stamp and die set, BBQ Roundabout, Hardwood stencil, Gingham stencil, Frames and Flags die set, Frames Squared die set, Circle Frames die set by Newton's Nook Designs #newtonsnook #handmade

Copic colors used on Buns:
  • E30, E21, E33
Seeds:
  • E40, E41
Lettuce:
  • YG01, YG05, YG09
Tomato:
  • R02, R05, R08
Cheese:
  • Y32, Y35, Y38
Burger:
  • E25, E27, E29
Sunglasses:
  • T7
Inky Paws Sketch Challenge - Buns Out stamp and die set, BBQ Roundabout, Hardwood stencil, Gingham stencil, Frames and Flags die set, Frames Squared die set, Circle Frames die set by Newton's Nook Designs #newtonsnook #handmade

For finishing touches on this card I added accents with a white gel pen, and glossy accents to the sunglasses!  Now it's time to get your paws inky creating a project for the Sketch Challenge using your Newton's Nook Designs products.  Be sure to link up to the Inky Paws Challenge!  Hope to see you there!

Wednesday, July 21, 2021

For my Prickly Friend Slimline Card

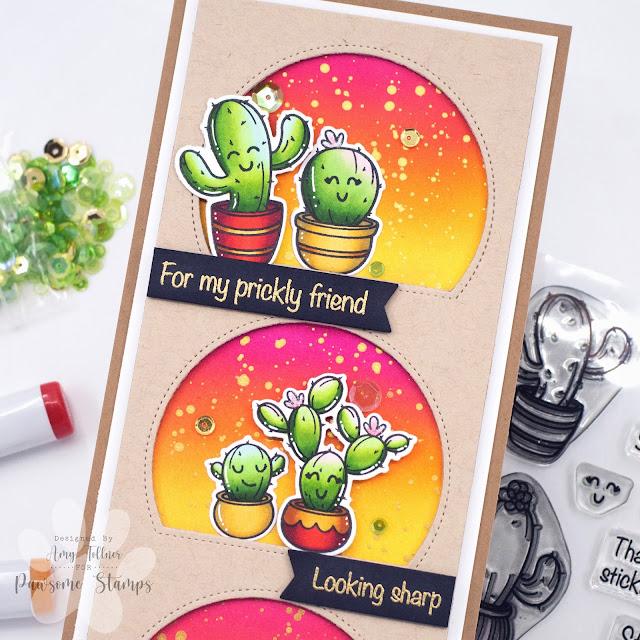
 Hi everyone!  I am up on the Pawsome Stamps blog today!  I just love the Prickly Friends Stamp Set, and I love adding the adorable faces to the cacti!  

Prickly Friend Stamp and Die set, Captivating Cactus Sequin Mix by Pawsome Stamps #pawsomestamps #handmade

To start this card I die cut a piece of kraft cardstock with a slimline window die.  The die itself cuts the cardstock to 8.5" by 3.5" so my smooth white cardstock panel measures 8.75" by 3.75".  I laid the die cut kraft cardstock over the white cardstock, marking the edges of the windows with a pencil.  I used my purple tape to mask off the edges of the white cardstock and blended Distress Inks Picked Raspberry, Spiced Marmalade, and Squeezed Lemonade in each of the window markings.  I then splattered some gold watercolor paint on my ink blended panel and set it aside to dry.  

Prickly Friend Stamp and Die set, Captivating Cactus Sequin Mix by Pawsome Stamps #pawsomestamps #handmade

Next, I stamped out all of the super cute cacti from the Prickly Friends Stamp Set, colored them with Copic markers, and cut them out with their coordinating die set.

I cut two banners out of black cardstock and gold heat embossed the sentiments.  Using these two sentiments together made me laugh!  

Prickly Friend Stamp and Die set, Captivating Cactus Sequin Mix by Pawsome Stamps #pawsomestamps #handmade

With all of my pieces complete, it was time to assemble my card!  I cut a piece of darker kraft cardstock to 9" by 4" for my cardbase on which I adhered the ink blended panel.  I used thin foam tape to pop up the kraft cardstock windows, and sentiments banners.  I then adhered the smaller cacti with liquid glue, and the larger cacti with foam tape.  

Prickly Friend Stamp and Die set, Captivating Cactus Sequin Mix by Pawsome Stamps #pawsomestamps #handmade

For finishing touches on this card I added white gel pen accents, glitter on the cacti's flowers, and a few sparkling sequins from the Captivating Cactus Sequin Mix!  Thank you so much and I hope you enjoyed my card today!  

Monday, July 19, 2021

Inky Paws Challenge #153 - Sketch Challenge

 Hi everyone!  A new Inky Paws Challenge starts today!  This is Inky Paws Challenge #153 - Sketch Challenge.  You have until Friday, July 30th to get your entries in and have a chance to win a $20 store credit to Newton's Nook Designs online shop!  The new stamp featuring Newton with his seashell is just too cute and I couldn't wait to use him on this card!

Newton's Nook Designs Inky Paws Challenge - Sketch Challenge

Inky Paws Sketch Challenge - Newton's Seashell stamp and die set, Seashell Roundabout, Seashells stencil, Circle Frames die set, Frames Squared die set, Frames and Flags die set by Newton's Nook Designs #newtonsnook #handmade

I started this card by die cutting a piece of purple cardstock to 5" by 7" for a cardbase.  I then cut a piece of smooth white cardstock to 4 1/2" by 6 1/2", and used the Seashells Stencil with Distress Oxide Inks Picked Raspberry, Wilted Violet, and Peacock Feathers to create the background.  

I cut a purple cardstock banner using the largest banner die in the Frames and Flags Die Set.  I cut a white glitter square using the smallest stitched square die in the Frames Squared Die Set, and a circle out of smooth white cardstock using the smallest scalloped circle in the Circle Frames Die Set.  

I blended the Distress Oxide colors Picked Raspberry, Wilted Violet, and Peacock Feathers on the scalloped circle.  I then white heat embossed the Seashell Roundabout onto the circle, and white heat embossed the sentiment on the banner as well.  

Inky Paws Sketch Challenge - Newton's Seashell stamp and die set, Seashell Roundabout, Seashells stencil, Circle Frames die set, Frames Squared die set, Frames and Flags die set by Newton's Nook Designs #newtonsnook #handmade

Next, I stamped the super adorable Newton's Seashell image, colored him with Copic markers, and cut him out with the coordinating die.  

After I had all of my pieces it was time to assemble this card!  First, I adhered my seashell background to the purple cardbase.  I then cut the banner in half and adhered it to the background so the top and bottom of the banner would be showing from underneath the square piece, which I adhered next on top of the banner.  I used thin foam tape with some liquid glue on it to pop up the scalloped circle, and foam squares to pop up Newton and give some more dimension to my card!  

Inky Paws Sketch Challenge - Newton's Seashell stamp and die set, Seashell Roundabout, Seashells stencil, Circle Frames die set, Frames Squared die set, Frames and Flags die set by Newton's Nook Designs #newtonsnook #handmade

Inky Paws Sketch Challenge - Newton's Seashell stamp and die set, Seashell Roundabout, Seashells stencil, Circle Frames die set, Frames Squared die set, Frames and Flags die set by Newton's Nook Designs #newtonsnook #handmade

Copic colors used for Newton:
  • YR000, YR20, YR21, YR12, YR14 - stripes
  • Ears - R01, R11, R20
  • Cheeks and Nose - R11
  • Belly - T0, T1, T2
Seashell:
  • E40, E41, E42, E43
  • R0000, R000, R01, R11, R20
Inky Paws Sketch Challenge - Newton's Seashell stamp and die set, Seashell Roundabout, Seashells stencil, Circle Frames die set, Frames Squared die set, Frames and Flags die set by Newton's Nook Designs #newtonsnook #handmade

For finishing touches on this card I added accents with a white gel pen, and glossy accents to Newton's cute little nose!  Now it's time to get your paws inky creating a project for the Sketch Challenge using your Newton's Nook Designs products.  Be sure to link up to the Inky Paws Challenge!  Hope to see you there!

Thursday, July 15, 2021

House Mouse Masked Maxwell

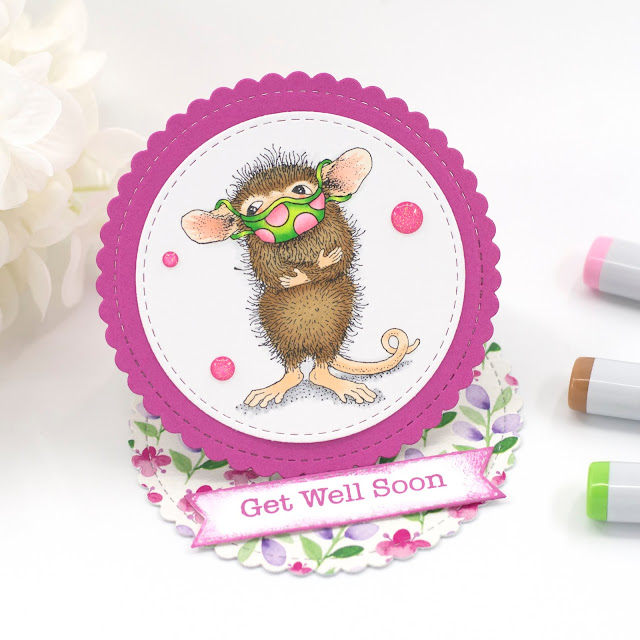
 Hi eveybody!  Today I am sharing an easel card I created for House Mouse and Friends Monday Challenge #344 - Anything Goes with the option of Easel Card.  Even though we are hopefully through the worst of this pandemic, the Masked Maxwell stamp is still super cute to use on a Get Well Card!


I started this card by die cutting a stitched circle from Copic friendly white paper, and a pink scalloped circle using Newton's Nook Designs Circle Frames die set.  I stamped this adorable image of Maxwell wearing his mask, colored him with Copic markers, and adhered my colored piece to the pink scalloped circle.  

Next, I used the scalloped circle die to die cut a card, and the patterned paper.  I adhered the patterned paper to the inside of the card, and folded the top of my card in half, creating the easel, adhering Maxwell to just the bottom portion.  

I then die cut a banner using the stitched fishtail banner die from Newton's Nook Designs Banner Trio die set.  I stamped my sentiment in matching pink, and inked the edges of the banner as well.  I popped up the banner with foam tape so it would hold up my easel!


  Copic colors used on Maxwell:
  • Fur - E31, E33, E35
  • Skin - E50, E51
  • Ears and Cheeks - E93
Mask:
  • YG01, YG06, YG09
  • RV10, RV21, RV13
Shadows:
  • N0, N1, N2, N3

To finish off this card I added glitter to the pink circles on Maxwell's mask, and pink sparkle dots!  Thank you and I hope you enjoyed my card today!

Wednesday, July 14, 2021

Pair of Stuck on You Cactus Cards

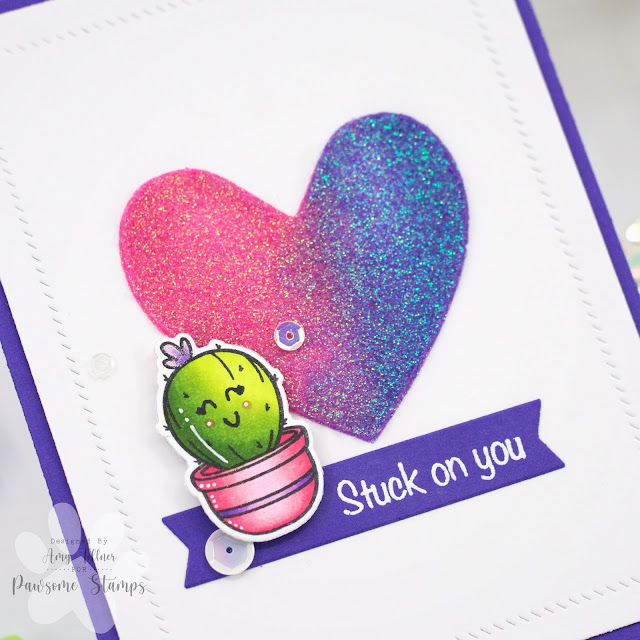
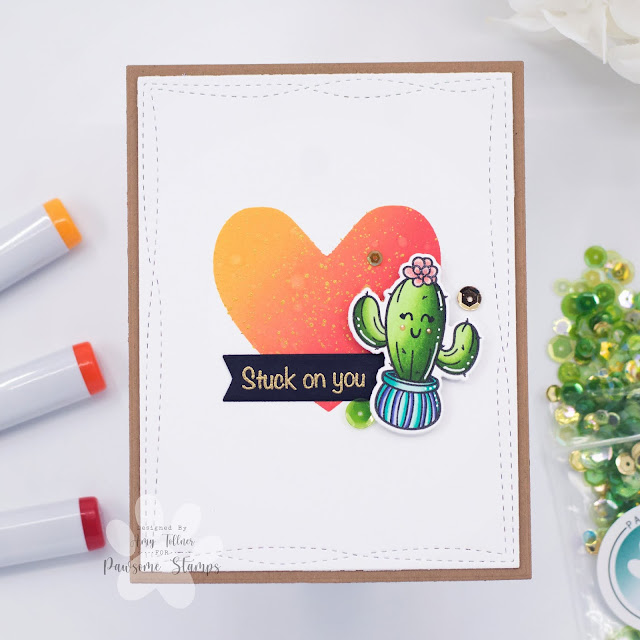
 Hi everyone!  Today I am sharing two cards I created using Pawsome Stamps Prickly Friend Stamp Set.  I love adding the faces to the cacti!  They are just too cute!

Prickly Friend Stamp Set, Prickly Friend Die Set, Dreamy Days Sequin Mix, Captivating Cactus Sequin Mix by Pawsome Stamps #pawsomestamps #handmadecards

I was inspired by Julianne's Camper Spotlight Scene Card, and went ahead and bought a bunch of spotlight stencils!  To start these cards I die cut a piece of smooth white cardstock for each, and lined up my heart spotlight stencil!  For the card on the left I applied pink and purple glitter paste across the stencil, and set it aside to dry.  For the card on the right I blended Distress Oxide Inks Mustard Seed, Ripe Persimmon, and Candied Apple.  I then left the stencil in place while I splattered the heart with some plain water and gold watercolor paint.  

As my hearts were drying, I stamped the super adorable cacti from the Prickly Friends Stamp Set, colored them with Copic markers, and cut them out with their coordinating dies.  

Next, I die cut a purple banner and white heat embossed the sentiment for the card on the left. Then die cut a black banner and gold heat embossed the sentiment for the card on the right.  After the hearts were dry, I adhered the heart panels to A2 size cardbases, the sentiment banners with liquid glue, and popped up the cacti with foam tape for some dimension!  

Prickly Friend Stamp Set, Prickly Friend Die Set, Dreamy Days Sequin Mix by Pawsome Stamps #pawsomestamps #handmadecards

Prickly Friend Stamp Set, Prickly Friend Die Set, Dreamy Days Sequin Mix by Pawsome Stamps #pawsomestamps #handmadecards

Prickly Friend Stamp Set, Prickly Friend Die Set, Dreamy Days Sequin Mix by Pawsome Stamps #pawsomestamps #handmadecards

Copic colors used for Cactus:
  • YG01, YG03, YG13, YG17
  • Cheeks - E93
Flower:
  • V01, V12, V04, V17
Pot:
  • RV10, RV21, RV13, RV14, RV25
  • V01, V12, V04, V17
Prickly Friend Stamp Set, Prickly Friend Die Set, Captivating Cactus Sequin Mix by Pawsome Stamps #pawsomestamps #handmadecards

Prickly Friend Stamp Set, Prickly Friend Die Set, Captivating Cactus Sequin Mix by Pawsome Stamps #pawsomestamps #handmadecards

Prickly Friend Stamp Set, Prickly Friend Die Set, Captivating Cactus Sequin Mix by Pawsome Stamps #pawsomestamps #handmadecards

Copic colors used for Cactus:
  • YG11, YG13, YG17, YG67
  • Cheeks - E93
Flower:
  • R11, R20, R22
Pot:
  • BG11, BG32, BG15
  • BV31, BV02, BV04
Prickly Friend Stamp Set, Prickly Friend Die Set, Dreamy Days Sequin Mix, Captivating Cactus Sequin Mix by Pawsome Stamps #pawsomestamps #handmadecards

For finishing touches on these cards I added accents with a white gel pen, glitter to the flowers, and a few sparkling sequins from the Pawsome Stamps Dreamy Days Sequin Mix and the Captivating Cactus Sequin Mix!  Don't forget to check out the Pawsome Stamps Blog and YouTube Channel for more inspiration!  Thank you and I hope you enjoyed my cards today!

Monday, July 12, 2021

Inky Paws Challenge #152 - Color Challenge Reminder

 Hi everyone!  This is an Inky Paws Challenge reminder post!  It is a Color Challenge, and the colors are Red, Pink, Yellow, and White.  You have until Friday, July 16th to get your entries in and have a chance to win a $20 store credit to Newton's Nook Designs online shop! 

Newton's Nook Designs Inky Paws Challenge - Color Challenge

Inky Paws Challenge Color Challenge - Heartfelt Butterflies stamp set, Monarchs stamp and die set, Heart Frames die set, Banner Trio die set by Newton's Nook Designs #newtonsnook #handmade

To start this card I cut a piece of red glitter cardstock to 5" x 7" for my cardbase.  I then cut a piece of white cardstock and adhered it to my glitter cardbase with liquid glue.  

I stamped the Heartfelt Butterflies, and one of the butterflies from the Monarchs stamp set, onto smooth white cardstock in black pigment ink and clear heat embossed.  I colored all of the butterflies with my Zig Clean Color Real Brush Markers.  I used the largest scalloped heart in the Heart Frames die set to cut out the butterflies, and also the largest die in that set to cut out the red glitter heart.  I adhered the scalloped butterfly heart to the red glitter heart with liquid glue.  I cut the Monarch butterfly out with it's coordinating die from the Monarchs die set.  

For the sentiment, I cut out a piece of smooth white cardstock with a banner die from the Banner Trio die set.  I stamped the sentiment from the Heartfelt Butterflies stamp set in embossing ink and red heat embossed.  I adhered the sentiment banner to red glitter cardstock and cut a small border around the banner.  

Next, I adhered the heart, sentiment banner, and Monarch butterfly to my card with foam tape for some dimension!  

Inky Paws Challenge Color Challenge - Heartfelt Butterflies stamp set, Monarchs stamp and die set, Heart Frames die set, Banner Trio die set by Newton's Nook Designs #newtonsnook #handmade

Inky Paws Challenge Color Challenge - Heartfelt Butterflies stamp set, Monarchs stamp and die set, Heart Frames die set, Banner Trio die set by Newton's Nook Designs #newtonsnook #handmade

Zig colors used:
  • Light Pink, Pink Haze
  • Yellow, Lemon Yellow
Inky Paws Challenge Color Challenge - Heartfelt Butterflies stamp set, Monarchs stamp and die set, Heart Frames die set, Banner Trio die set by Newton's Nook Designs #newtonsnook #handmade

This card is pretty glittery already with all of the red glitter cardstock, but I did add a few sparkling sequins to finish it up!  Now it's time to get your paws inky creating a project for the Color Challenge using your Newton's Nook Designs products.  Be sure to link up to the Inky Paws Challenge!  Hope to see you there!

Monday, July 5, 2021

Your my Cup of Tea Slimline Card

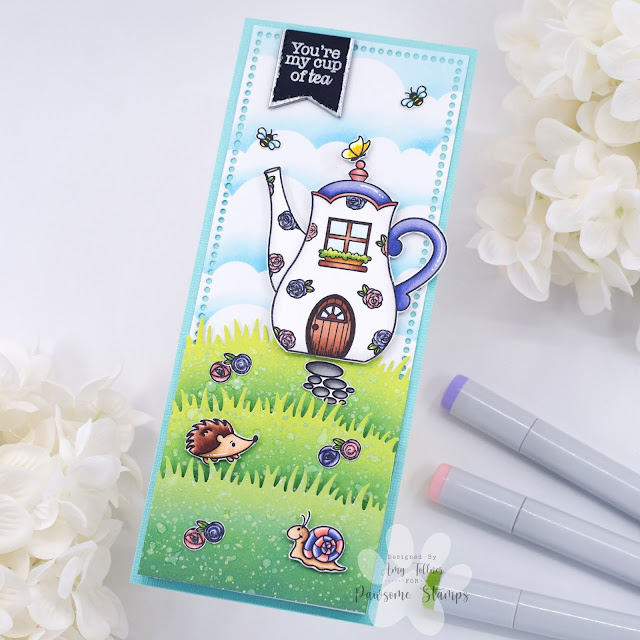
 Hi everyone!  I'm over on the Pawsome Stamps Blog today for my first blog post!  I am so excited and grateful to be on their wonderful team!  I love the Cup of Tea stamp set!  It is so versatile, and the hedgehog and snail are just too cute!!

Cup of Tea stamp set by Pawsome Stamps #pawsomestamps

I started this card by die cutting the slimline panel and grass from smooth white cardstock.  I ink blended the grass, splattering it with water and watercolor paint, and I used a clouds stencil to ink blend the sky.  

Next, I stamped out all of these wonderful images from the Cup of Tea stamp set!  I used one of the small flower images to randomly stamp around the teapot and create a floral design!  I colored all of the images with my Copic markers and fussy cut them out.  I then used a white gel pen to go over the parts of the stamped flowers that were outside the edge of the teapot.  The white gel pen works great for that, and I was so pleased with the way the teapot came out!  I used a combination of liquid glue and foam tape to adhere the grass, and all of my images!

Cup of Tea stamp set by Pawsome Stamps #pawsomestamps

For the sentiment, I die cut a black cardstock banner, and silver heat embossed the sentiment, and the edges of the banner as well.  I adhered the sentiment piece to my card with thin foam tape.  For some reason, sometimes the hardest part of making a card for me is deciding on a color for the cardbase!  For this card, I chose a lighter blue textured cardstock, and adhered my completed card panel to my cardbase!  

Cup of Tea stamp set by Pawsome Stamps #pawsomestamps

For finishing touches on this card I added white gel pen accents and glitter to the flowers for some extra sparkle!  Thank you and I hope you enjoyed my card today!  

Don't forget to stop by the Pawsome Stamps shop today to save 20% off your entire order!!  

Pawsome Stamps 4th of July Sale #pawsomestamps

Inky Paws Challenge #152 - Color Challenge

 Hi everybody!  A new Inky Paws Challenge starts today!  It is a Color Challenge.  The colors are Red, Pink, Yellow, and White.  You have until Friday, July 16th to get your entries in and have a chance to win a $20 store credit to Newton's Nook Designs online shop!  I thought these colors would be perfect for a little retro kitchen vibe!

Newton's Nook Designs Inky Paws Challenge - Color Challenge
Inky Paws Challenge Color Challenge - Made From Scratch stamp and die set, Tumbling Hearts stencil, Slimline Frames and Portholes die set, Slimline Frames and Windows die set, Slimline Masking Circles and Squares stencil set by Newton's Nook Designs #newtonsnook #handmade

I started this card by die cutting a piece of smooth white cardstock with the scalloped frame die in the Slimline Frames and Portholes die set.  I lined up the square masking stencil from the Slimline Masking Circles and Squares stencil set and inked each square with Worn Lipstick Distress Oxide Ink.  I left the masking square stencil in place, and placed the Tumbling Hearts stencil over each square and inked it with Spun Sugar Distress Oxide Ink.  

Next, I stamped out my images from the Made From Scratch stamp set onto Copic friendly white paper, mirror stamping the mixer.  It was actually my first time mirror stamping after wanting to try it forever!  It was pretty easy, and I will definitely be doing that again sometime!  I colored all of the images with Copic markers, cut them out with their coordinating dies, and fussy cut the mirror stamped image.  

I white heat embossed the sentiment in the center square, and decided on pink glitter cardstock for my base, adhering my scalloped panel with liquid glue.  I used the window die from the Slimline Frames and Windows die set to cut matching pink glitter windows and adhered them to my card with foam tape.  I used foam tape to adhere the mixers as well, and liquid glue to attach the spoon and spatula on top of the window panel.  

Inky Paws Challenge Color Challenge - Made From Scratch stamp and die set, Tumbling Hearts stencil, Slimline Frames and Portholes die set, Slimline Frames and Windows die set, Slimline Masking Circles and Squares stencil set by Newton's Nook Designs #newtonsnook #handmade

Inky Paws Challenge Color Challenge - Made From Scratch stamp and die set, Tumbling Hearts stencil, Slimline Frames and Portholes die set, Slimline Frames and Windows die set, Slimline Masking Circles and Squares stencil set by Newton's Nook Designs #newtonsnook #handmade

Copic colors used for Red:
  • R05, R24, R46, R39
Pink:
  • R81, R83, R85
Yellow:
  • Y11, Y13, Y15, Y17
Inky Paws Challenge Color Challenge - Made From Scratch stamp and die set, Tumbling Hearts stencil, Slimline Frames and Portholes die set, Slimline Frames and Windows die set, Slimline Masking Circles and Squares stencil set by Newton's Nook Designs #newtonsnook #handmade

For finishing touches on this card I added glitter and glossy accents to the hearts, and a few sparkling sequins!  Now it's time to get your paws inky creating a project for the Color Challenge using your Newton's Nook Designs products.  Be sure to link up to the Inky Paws Challenge!  Hope to see you there!

Thursday, July 1, 2021

Pawsome Stamps Design Team

 Hi everyone!!  I am so excited to announce that I have been chosen to be on the very first Pawsome Stamps Design Team!  It is such an honor to be on this team, and I can't thank them enough!  I am looking forward to working with all of these wonderful ladies, and I hope to inspire you to create with all of the wonderful products that Pawsome Stamps has to offer!