Showing posts with label Spooky Street. Show all posts

Monday, September 25, 2023

Inky Paws Challenge #207 - Inky Paws Challenge Reminder Post

  Hi everybody!  This is an Inky Paws Challenge reminder post!  This is Inky Paws Challenge #207 - Sketch Challenge.  You have until Friday, September 29th to get your entries in and have a chance to win a $20 store credit to Newton's Nook Designs online shop!

Newton's Nook Designs Inky Paws Challenge - Sketch Challenge

Halloween Meows Paper Pad, Halloween Woofs Paper Pad, Spooky Street Stamp Set, Oval Frames Die Set by Newton's Nook Designs #newtonsnookdesigns #newtonsnook #nnd #handmade

I started this card by cutting 1 inch strips of patterned paper from the Halloween Meows and Halloween Woofs Paper Pads.  I then aligned them diagonally and adhered them to a piece of paper that is approximately 5 3/4" x 3 3/4".

Halloween Meows Paper Pad, Halloween Woofs Paper Pad, Spooky Street Stamp Set, Oval Frames Die Set by Newton's Nook Designs #newtonsnookdesigns #newtonsnook #nnd #handmade

Next, I die cut a piece of black cardstock using the Oval Frames Die Set.  I stamped the sentiment and eyes from the Spooky Street Stamp Set and white heat embossed.

I assembled my card using a purple cardbase measuring 6 1/2" x 5".  I used foam tape to pop up the oval for some dimension!

Halloween Meows Paper Pad, Halloween Woofs Paper Pad, Spooky Street Stamp Set, Oval Frames Die Set by Newton's Nook Designs #newtonsnookdesigns #newtonsnook #nnd #handmade

For finishing touches on this card I added a few sparkling sequins!  Now it's time to get your paws inky creating a project for the Sketch Challenge using your Newton's Nook Designs products.  Be sure to link up to the Inky Paws Challenge!  Hope to see you there!

Monday, October 17, 2022

Inky Paws Challenge #184 - Halloween Theme Reminder Post

  Hi everyone!  This is an Inky Paws Challenge reminder post!  This is Inky Paws Challenge #184 - Halloween Theme.  You have until Friday, October 21st to get your entries in and have a chance to win a $20 store credit to Newton's Nook Designs online shop!

Newton's Nook Designs Inky Paws Challenge - Theme Challenge
Halloween Pile Stamp and Die Set, Spooky Street Stamp Set, Sky Scene Builder Die Set, Land Borders Die Set, Framework Die Set by Newton's Nook Designs #newtonsnookdesigns #newtonsnook #handmade

I started this card by die cutting a piece of smooth white cardstock using the large postage stamp die from the Framework Die Set.  I then blended on Distress Oxide Inks Picked Raspberry, Wilted Violet, Blueprint Sketch, and Black Soot to create a Halloween sky.  I used the grass die from the Land Borders Die Set to cut out some black cardstock, and the Sky Scene Builder Die Set to cut out the moon. 

Next, I stamped this super cute image from the Halloween Pile Stamp Set, colored it with copic markers, and die cut it out using the coordinating die set. I stamped the tree and owl from the Spooky Street Stamp Set directly onto my background in black pigment ink. I then stamped the gravestones from the same stamp set and fussy cut them out.  

Halloween Pile Stamp and Die Set, Spooky Street Stamp Set, Sky Scene Builder Die Set, Land Borders Die Set, Framework Die Set by Newton's Nook Designs #newtonsnookdesigns #newtonsnook #handmade

I stamped the sentiment, which is from the Spooky Street Stamp Set, onto black cardstock and white heat embossed.  I then fussy cut the sentiment.

I assembled my card using black cardstock for the base, and popped up the image and sentiment with foam tape for some dimension! 

Halloween Pile Stamp and Die Set, Spooky Street Stamp Set, Sky Scene Builder Die Set, Land Borders Die Set, Framework Die Set by Newton's Nook Designs #newtonsnookdesigns #newtonsnook #handmade

For finishing touches on this card I added accents with a white gel pen, a little glitter, and glossy accents!  Now it's time to get your paws inky creating a Halloween Theme project using your Newton's Nook Designs products!  Be sure to link up to the Inky Paws Challenge!  Hope to see you there!

Monday, October 4, 2021

Inky Paws Challenge #158 - Color Challenge Reminder

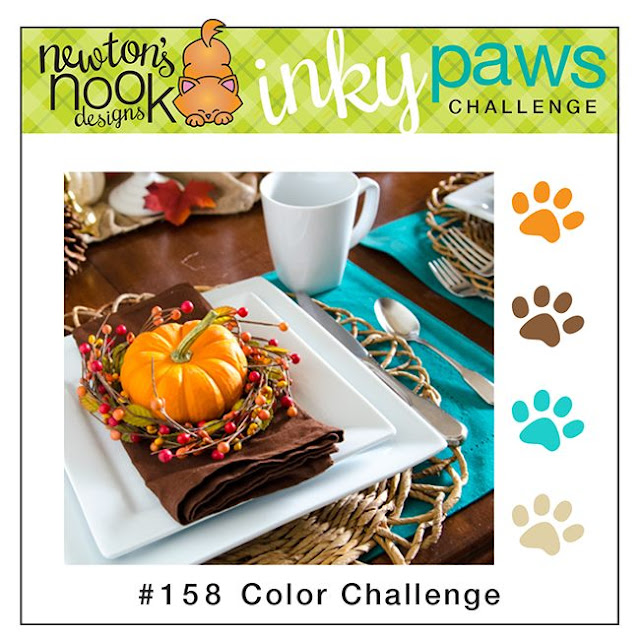
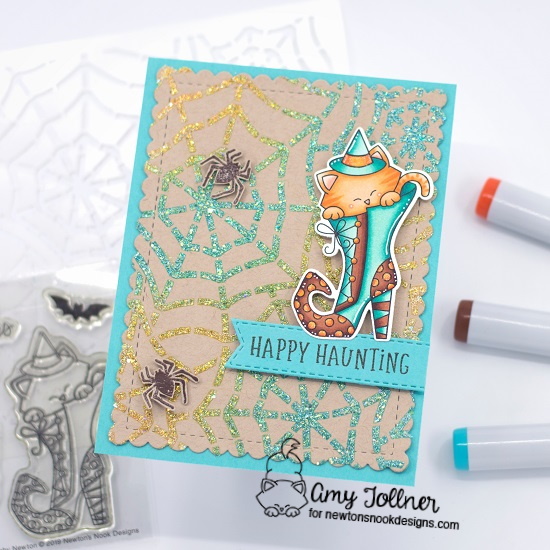
 Hi everyone!  This is an Inky Paws Challenge reminder post!  It is a Color Challenge, and the colors are Orange, Brown, Teal, and Kraft.  You have until Friday, October 8th to get your entries in and have a chance to win a $20 store credit to Newton's Nook Designs online shop!  

Newton's Nook Designs Inky Paws Challenge - Color Challenge

Witchy Newton Stamp and Die Set, Spooky Roundabout, Spooky Street Stamp Set, Spiderweb Stencil, Frames and Flags Die Set, Banner Trio Die Set by Newton's Nook Designs #newtonsnook #handmade

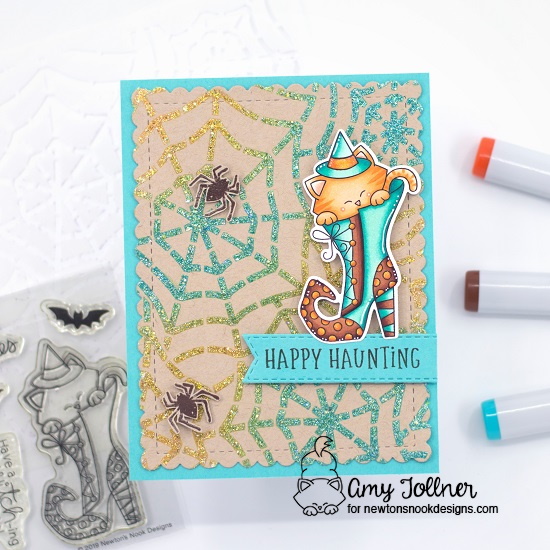
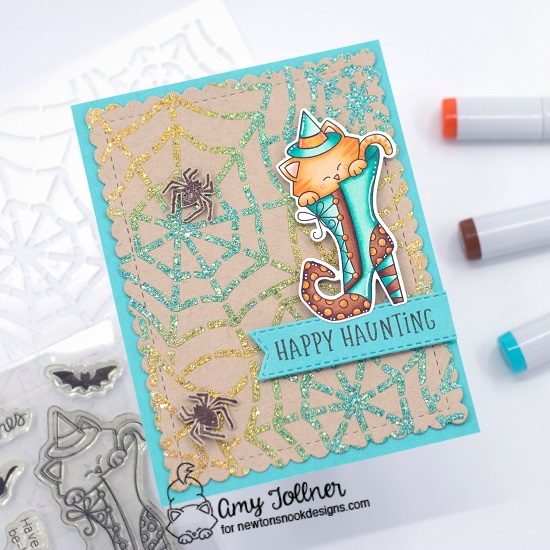
To start this card I cut a teal cardbase to A2 size.  I then die cut a piece of Kraft cardstock with the scalloped frame in the Frames and Flags Die Set.  I used the Spiderweb Stencil with Distress Oxide Inks Spiced Marmalade and Peacock Feathers.  Leaving the stencil in place, I applied a layer of glitter paste to give the spiderweb some sparkle!  

Witchy Newton Stamp and Die Set, Spooky Roundabout, Spooky Street Stamp Set, Spiderweb Stencil, Frames and Flags Die Set, Banner Trio Die Set by Newton's Nook Designs #newtonsnook #handmade

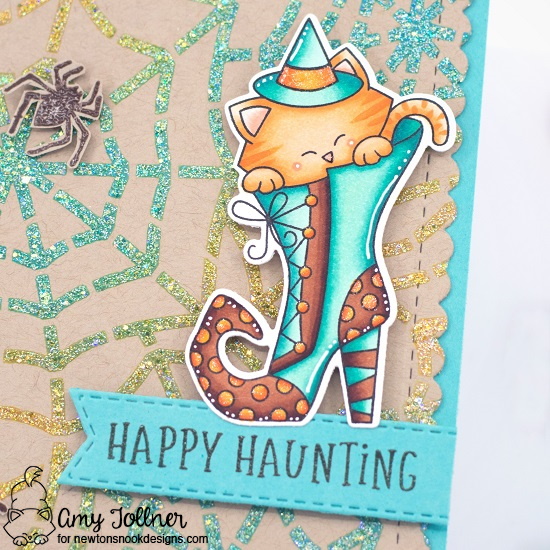
Next, I stamped out one of my favorite Halloween images, Witchy Newton!  I colored the image with Copic markers, and cut it out with the coordinating die set.  I stamped a couple of spider images from the Spooky Street Stamp Set in brown pigment ink on Kraft cardstock, clear heat embossed them, and fussy cut them out.  

Witchy Newton Stamp and Die Set, Spooky Roundabout, Spooky Street Stamp Set, Spiderweb Stencil, Frames and Flags Die Set, Banner Trio Die Set by Newton's Nook Designs #newtonsnook #handmade

I used the stitched fishtail banner in the Banner Trio Die Set to cut a piece of teal cardstock for my sentiment.  I stamped the sentiment, which is from the Spooky Roundabout, in brown pigment ink and clear heat embossed for some shine!  I then adhered all of my images with foam tape for some dimension!  

Witchy Newton Stamp and Die Set, Spooky Roundabout, Spooky Street Stamp Set, Spiderweb Stencil, Frames and Flags Die Set, Banner Trio Die Set by Newton's Nook Designs #newtonsnook #handmade

For finishing touches on this card I added white gel pen accents, glitter with a glitter pen, and glossy accents to Newton's cute little nose!  Now it's time to get your paws inky creating a project for the Color Challenge using your Newton's Nook Designs products.  Be sure to link up to the Inky Paws Challenge!  Hope to see you there!

Monday, September 13, 2021

Inky Paws Challenge #157 - Halloween Theme!

 Hi everybody!  A new Inky Paws Challenge starts today!  You have until Friday, September 24th to get your entries in and have a chance to win a $20 store credit to Newton's Nook Designs online shop!  This is Inky Paws Challenge #157 - Halloween Theme.  I love making Halloween cards, but I wanted to do something a little different this time!  I finally made a shadow box!  It was so much fun and I hope to make more in the future!

Newton's Nook Designs Inky Paws Challenge - Halloween Theme

Count Newton Stamp and Die Set, Spooky Street Stamp Set, Spooky Skeletons Stamp Set, Land Borders Die Set, Halloween Trio Die Set, Peppermint Die Set by Newton's Nook Designs #newtonsnook #handmade

I started by painting the box itself with Black Soot Distress Paint and set it aside to dry.  Next, I cut down a piece of smooth white cardstock to fit inside the box and blended Distress Oxide Inks Picked Raspberry, Wilted Violet, and Peacock Feathers for a Halloween night sky.  I then splattered it with white and black paint, and set it aside to dry as well.  I used the Land Borders Die Set to cut a hill and grass from black cardstock.  I made sure to leave a little extra cardstock on the bottom so I could fold it and attach it to the shadow box.

I stamped out the super cute Newton with his cape and fangs, and the gravestones, from the new Count Newton Stamp Set.  I colored them with Copic markers and cut them out with their coordinating die set.  I stamped out the tree, owl, and skeleton rat in black pigment ink, and fussy cut them out.  The tree and owl are from the Spooky Street Stamp Set, and the rat is from the Spooky Skeletons Stamp Set.  I used the solid round die from the Peppermint Die Set for the moon, and the bat dies from the Halloween Trio Die Set to create black glitter bats!  I die cut four bats, gluing the bodies of two together, and gently bending up the wings of the top bat to make it look like they are flying!

With all of the pieces ready, it was time to assemble my shadow box!  First, I glued my ink blended background to the back of the box.  I then adhered the hills and grass to the bottom of the box.  I knew I wanted to light it up so I tucked a string of purple Tim Holtz Halloween Lights behind the hills and grass.  After figuring out the placement of the tree, I glued down the moon, tree, and owl.  I made little tabs for Newton and the gravestones so I could easily stand them up in the box.  Next, I glued the skeleton rat in the corner, and then adhered the bats to the sky background!  

Count Newton Stamp and Die Set, Spooky Street Stamp Set, Spooky Skeletons Stamp Set, Land Borders Die Set, Halloween Trio Die Set, Peppermint Die Set by Newton's Nook Designs #newtonsnook #handmade

Copic colors used for Newton:
  • Fur - YR000, YR20, YR21, YR12, YR14 - stripes
    • C0, C1
  • Ears - R01, R11, R20
  • Nose - R11
  • Cape - V01, V12, V04, V17
    • BG11, BG23, BG13, BG57, BG18
Graves:
  • C00, C0, C1, C2, C3, C4, C5
  • Bat - V01, V12, V04, V17
Moon:
  • Y0000, C00
Count Newton Stamp and Die Set, Spooky Street Stamp Set, Spooky Skeletons Stamp Set, Land Borders Die Set, Halloween Trio Die Set, Peppermint Die Set by Newton's Nook Designs #newtonsnook #handmade

For finishing touches I added accents with a white gel pen, and glossy accents to Newton's nose and fangs!  I love the way this shadow box came out and it was so much fun to create!  Now it's time to get your paws inky creating a project with a Halloween Theme and your Newton's Nook Designs products!  Be sure to link up to the Inky Paws Challenge!  Hope to see you there!

Friday, October 16, 2020

Be-witch-ing Newton

 Hi everyone!  Today I am sharing a card I made for Newton's Nook Designs Inky Paws Challenge #134 - Color Challenge.  The colors are Orange, Purple, Yellow, and Black.  I used the Witchy Newton stamp for the last color challenge as well, but I just love this stamp!  It is so much fun to color!


This is an A6 size card, which is 6 1/4" x 4 1/2".  I started by die cutting a mask for the moon from Altenew's To the Moon die set.  I used purple tape to temporarily attach it to my background and began ink blending.  I used Distress Oxide Ink colors Mustard Seed, Spiced Marmalade, and Wilted Violet.  You can only see a little bit of the Wilted Violet since most of it got covered up with the hill and grass.  I then used Black Soot Distress Oxide Ink with NND Clouds stencil.  After inking the background, I flicked a little black paint onto it for some added texture.  After the background had dried, I removed the mask for the moon and stamped it with the coordinating moon stamp.  

Next, I cut out the hill and grass with NND Land Borders dies.  I adhered them to my card with liquid glue and foam tape.  I stamped the house from NND Spooky Street stamp set with black pigment ink right onto my card, and then stamped the graveyard from the same set onto white cardstock, which I fussy cut.  I stamped out one of my favorite Newton images, Witchy Newton, and colored it with Copic markers.  I stamped the sentiment in embossing ink and white heat embossed. 

After everything else was attached to the card, I was able to place the bats exactly where I wanted them.  I used the bat dies from NND Halloween Trio die set to cut out six glitter bats.  I adhered three down flat, then attached a second bat on top of each, just by the body, so I could bend the wings up to make the bats look in flight!  


Copic colors used for Newton:
  • YR0000, YR000, YR20, YR31 - stripes
  • Ears - R00, R11, R20
  • Nose - R11
Hat and Boot:
  • V01, V12, V04, V17
  • Y17, YR04, YR07, YR09

For finishing touches on this card I added glitter to Newton's hat band and glossy accents to his nose.  I did use Copic color Y04 on the buttons and polka dots of the boot before adding yellow glitter Stickles on top!  Thank you and I hope you enjoyed my card today!

Wednesday, October 14, 2020

Fangs So Much!

Hi everyone!  Today I am sharing a card I created for Your Next Stamp Challenge #149 - Give Thanks.  I love making Halloween cards, and I just love this cute kitty and the sentiment.  I couldn't wait to use them!


I started the background by blending Distress Ink colors Blueprint Sketch, Wilted Violet, Picked Raspberry, and Black Soot around the edges.  I then used white gouache with a tiny bit of water and flicked it onto my background.  After drying, I used Simon Says Stamp Batty stencil with Midnight Sparkle Kiss glitter paste.  I set my background aside to dry and die cut the grass out of black cardstock with Newton's Nook Designs Land Borders die.  I then stamped this adorable image from Your Next Stamp Happy Meowoeen stamp set.  I colored the image with Copic markers and cut it out with the coordinating die.  

After the bats had dried, I stamped the tree, gravestones, and owl from Newton's Nook Designs Spooky Street stamp set with black pigment ink.  I adhered the first layer of grass with liquid glue, and the second with foam tape.  I then attached my kitty image with liquid glue and foam tape as well.  I used the smallest banner die in the Your Next Stamp Stitched Fishtail Banner die set to cut out the banner for my sentiment.  I then stamped the sentiment in embossing ink and white heat embossed.  I popped up the banner on thin foam squares for a little dimension!


Copic colors used for Kitty:
  • Y35, Y17, YR15, YR16
  • Stripes - YR15, YR16, YR18, YR27
  • Ears and Nose - R20, R32, R43
  • Bowtie - R05, R27, R46, R39
  • Cape - C3, C5, C7, C9
Mouse:
  • N0, N2, N4
  • Ear - R20, R32, R43
  • Nose - R43
Coffin:
  • E31, E35, E57, E79
I used a gold metallic pen on the cross the mouse is holding, and a silver metallic pen on the coffin to look like nail heads.  


For finishing touches on this card I added glitter to the kitty's bowtie and glossy accents on his nose and fangs!  Thank you and I hope you enjoyed my card today!

Thursday, August 6, 2020

Spooky Skeletons Slimline Card

Hello everyone!  Today I am sharing a card I made for Newton's Nook Designs Inky Paws Challenge #129 - Sketch Challenge.  I used the fluorescent Copic markers to create this fun Halloween card!  If you would like to see my previous post featuring fluorescent Copics please click here.
I started creating the background by blending Distress Oxide Inks Wilted Violet, Blueprint Sketch, and Black Soot.  I then added a tiny bit of water to some white gouache and flicked it onto my inked panel to resemble a starry sky.  Next, I die cut a piece of black glitter card stock using Newton's Nook Designs portholes die from the Slimline Frames and Portholes die set. 

As my sky background was drying, I stamped the images from NND Spooky Skeletons stamp set with dye ink.  I left the stamps in place in my stamp positioning tool while I colored the images with the bright and gorgeous fluorescent Copic markers!  After I was finished coloring, I re-stamped my images with black pigment ink and clear heat embossed them for a shiny look.  I then die cut them out with the coordinating die set.  Since the black pigment ink is so dark, using it with the fluorescent Copics really makes the colors pop!  

After my sky background was dry, I attached it to a piece of black glitter card stock for a border, and then attached the black glitter portholes to my sky background with foam tape.  After figuring out the placement of my skeletons, I stamped the sentiments and images from NND Spooky Street stamp set with black pigment ink.  I adhered the skeletons in place with liquid glue and foam tape.

Copic colors used:
  • FRV1, FYR1, FY1, FYG1, FV2, FYG2, FBG2, FB2
I had a lot of fun making this card and really enjoyed using the fluorescent Copic markers.  I hope to bring you more cards featuring these markers in the future, and I hope I was able to inspire you to get your fluorescent Copics out and have fun with them!