Wednesday, April 28, 2021

Sending Tweet Greetings Card

 Hi everyone!  Today I am sharing a card I made for Your Next Stamp Challenge #162 - Sketch, and Simon Says Stamp Wednesday Challenge - Anything Goes.  This stamp is so adorable and I couldn't wait to color it!


To start this card I die cut a piece of Copic friendly white paper with the largest die in My Favorite Things Wonky Stitched Ovals die set.  I stamped this super cute image from Your Next Stamp's Blossom stamp set and colored it with Copic markers.  I just love this puppy!  He is too cute!  After I was done coloring, I decided on the blue cardstock for the background, which I die cut with the largest die from YNS Stitched Rectangle die set.  I then decided on the cute matching floral paper for my cardbase, and the bottom strip of the sketch.  I adhered my cardbase, blue layer, and oval piece altogether with liquid glue. 

Next, I cut a white strip of cardstock for the sentiment, which I stamped in black pigment ink.  I adhered the sentiment piece and floral strip to my card with liquid glue.  


Copic colors used for Pup:
  • YR21, YR24, YR27
  • T0, T1
  • Beans - E93
Birds:
  • BG10, BG11, BG23, BG15
  • Y04, Y08, YR04
Flowers:
  • R20, R22, R14
  • Y23, Y26
Leaves and Grass:
  • YG01, YG06, YG17
Branch:
  • E11, E13, E15
Sky:
  • B0000, B000

For finishing touches on this card I added glitter to the flowers, and glossy accents to the flower centers, beaks of the birds, and the pup's beans, eyes, and nose.  Thank you and I hope you enjoyed my card today!

Tuesday, April 27, 2021

Sending Hugs Floral Garden Slimline Card

 Hi All!  Today I am sharing a card I created for Simon Says Stamp Wednesday Challenge - Sending Hugs.  I don't have any Impression Obsession products on hand, so I used a Simon stamp instead!


I started this card by die cutting a piece of smooth white cardstock with the largest stitched die in Lawn Fawn's Large Slimline with Sliders die set.  I then stamped the absolutely gorgeous SSS Floral Garden image and gold heat embossed.  I used my Zig Clean Color Real Brush markers to color the image, and then splattered some gold watercolor paint across the whole panel.  After my panel was dry, I adhered it to a gold glitter cardbase.  

For the sentiment I die cut a piece of black cardstock using the smallest die in Memory Box's Wrapped Stitched Rectangles die set.  I gold heat embossed the sentiment from SSS Sketched Flowers stamp set.  I gold heat embossed along the edges of the sentiment piece as well, then adhered it to my card with foam tape for a bit of dimension!


Zig colors used for Flowers:
  • Light Carmine
  • Pink
  • Lilac, English Lavender
  • Purple with Light Brown center
  • Turquoise Green, Light Blue with Yellow center
  • Bright Yellow, Yellow, Lemon Yellow with Light Brown center
Leaves:
  • Light Green, Yellow Green
  • Olive Green, Mid Green

I added some sparkling sequins throughout the card for a finishing touch!  Thank you and I hope you enjoyed my card today!

Monday, April 26, 2021

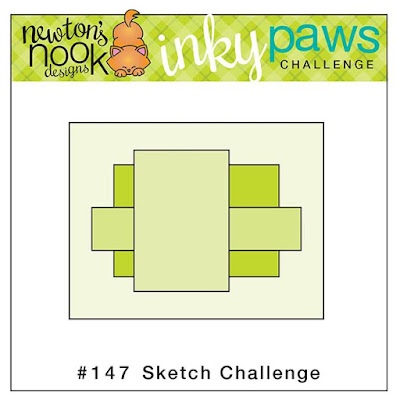
Inky Paws Challenge #147 - Sketch Challenge

 Hi everyone!  A new Inky Paws Challenge starts today!  This is Inky Paws Challenge #147 - Sketch Challenge.  You have until Friday, May 7th to get your entries in and have a chance to win a $20 store credit to Newton's Nook Designs online shop! 

Newton's Nook Designs Inky Paws Challenge - Sketch Challenge
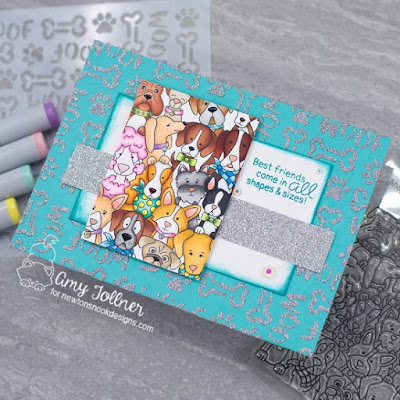
Inky Paws Challenge Sketch Challenge - Woof stencil, Woof Pack stamp set by Newton's Nook Designs #newtonsnook #handmade

Before I started creating this card, I actually made a template for myself so I knew what sizes to make my pieces.  I made the cardbase first, cutting a piece of teal cardstock to 5" by 7", and using silver glitter paste with NND Woof stencil.  I set my base aside to dry, and cut a piece of white cardstock to 3" by 5", and a piece of silver glitter cardstock to 6" by 1".  

Next, I stamped the super cute NND Woof Pack stamp onto Copic friendly white paper, and colored it with my markers.  It was hard for me to decide where I wanted to cut this piece down, and did my best to include all of the pups somehow.  I cut my puppy panel down to 2 3/4" by 3 3/4".  

I used teal ink to stamp the sentiment, also from NND Woof Pack stamp set, and inked the edges of the white panel.  I then adhered it to my cardbase with liquid glue.  I also glued down the silver glitter strip.  I used foam tape to pop up my puppy panel and give a bit of dimension!

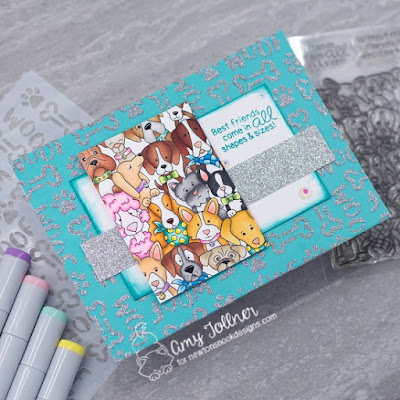
Inky Paws Challenge Sketch Challenge - Woof stencil, Woof Pack stamp set by Newton's Nook Designs #newtonsnook #handmade

Inky Paws Challenge Sketch Challenge - Woof stencil, Woof Pack stamp set by Newton's Nook Designs #newtonsnook #handmade

This is usually where I put what color markers I used, however, I used so many different color combos on this card it would be just so long to list, and it might get a bit confusing too!  I do have a list of the colors I used, so if you would like to know the Copic color combo I used on a specific dog, please feel free to contact me! 

Inky Paws Challenge Sketch Challenge - Woof stencil, Woof Pack stamp set by Newton's Nook Designs #newtonsnook #handmade

To finish off this card I added glitter to the collars and bowties.  I used gold and silver glitter Stickles on the tags, and glossy accents on all of their noses!  I also added a few iridescent crystals for extra sparkle!  Now it's time to get your paws inky creating a project for the Sketch Challenge using your Newton's Nook Designs products.  Be sure to link up to the Inky Paws Challenge!  Hope to see you there!

Wednesday, April 21, 2021

House Mouse Berry Basket

 Hi everybody!  Today I am sharing a card I created for House Mouse and Friends Monday Challenge #338 - Anything Goes with the option of Outdoor Fun.  I think this stamp is so cute, and who wouldn't have fun picking berries and snacking on some too?!


To start this card I cut a piece of blue cardstock to A2 size for my cardbase.  I used the postage stamp die from Newton's Nook Designs Framework die set to cut a piece of Copic friendly white paper.  I then stamped the adorable House Mouse and Friends Berry Basket image featuring Mudpie, Monica, and Muzzy, and colored it with Copic markers.  

The sentiment is from Newton's Nook Designs Basket of Wishes stamp set.  I stamped it in black pigment ink and clear heat embossed for some shine!


Copic colors used for Mudpie:
  • Fur - E21, E23, E25
  • Skin - E50, E51
  • Nose, Cheeks, Ears - E93
Monica:
  • Fur - T1, T3, T5
  • Skin - E50, E51
  • Nose, Cheek, Ear - E93
Muzzy:
  • Fur - W3, W5, W6
  • Skin - E50, E51
  • Nose, Cheek, Ear - E93
Berries:
  • BV31, BV20, BV34, BV04
Basket:
  • Y23, Y26, Y28
Grass:
  • YG01, YG06, YG17
Sky:
  • B0000, B000, B00

For finishing touches on this card all I did was add glossy accents to to their cute little noses!  Thank you and I hope you enjoyed my card today!

Tuesday, April 20, 2021

Bright, Clean and Simple Elephant Card

 Hi everyone!  Today I am sharing a card I created for Simon Says Stamp Monday Challenge - Bright, Cheerful Colors, and Simon Says Stamp Wednesday Challenge - Clean and Simple.  I just love the way this card came out, and it was super easy and fun to make!


To start this card, I die cut a white cardbase using the largest die from Waffle Flower's A2 Layers die set.  I then cut a second piece of white cardstock with the same die, lined up the diagonal stripe stencil from SSS Simple Patterns Trio, and blended Distress Oxide Inks Picked Raspberry, Wilted Violet, and Mermaid Lagoon.  Next, I used the second largest die in Waffle Flower's A2 Layers die to cut down my ink blended panel, and adhered it to my cardbase with foam tape for dimension. 

I then stamped out this super adorable elephant image and balloon from Pretty Pink Posh's Elephant Friends stamp set.  I colored them with Copic markers and cut them out with their coordinating dies.  I cut a little slit by the elephant's hand so I could slip in the end of the balloon behind his hand, and then popped him up on foam tape!


Copic colors used for Elephant:
  • T0, T1, T2, T3, T5
  • R00, R11, R20
Balloon:
  • Y00 Y02, Y06, Y08

For finishing touches on this card I added glitter and glossy accents to the balloon, and a few sparkling sequins!  Thank you and I hope you enjoyed my card today!

Monday, April 19, 2021

Inky Paws Challenge #146 - Color Challenge Reminder

  Hi everyone!  This is an Inky Paws Challenge #146 - Color Challenge reminder post.  The colors are Orange, Yellow, Green, and White.  You have until Friday, April 23rd to get your entries in and have a chance to win a $20 store credit to Newton's Nook Designs online shop! 

Newton's Nook Designs Inky Paws Challenge - Color Challenge

Inky Paws Challenge Color Challenge - Newton's Flower Garden stamp and die set, Floral Roundabout, Spring Roundabout, Slimline Frames and Portholes die set, Banner Trio die set by Newton's Nook Designs #newtonsnook #handmade

To start this card I cut a piece of green glitter cardstock to 8.5" by 3.5" for my cardbase.  I used the scalloped frame die in NND Slimline Frames and Portholes die set to cut a piece of white cardstock, and the portholes die to cut another piece of green glitter cardstock.  I used liquid glue to adhere the white scalloped piece to the green glitter cardbase.

Next, I stamped out the adorable image of Newton laying in flowers from Newton's Flower Garden stamp set.  I just love that image so much!  I then stamped out NND Floral Roundabout twice.  I colored my Newton image and two sections of each roundabout with Copic markers.  I used the coordinating die from Newton's Flower Garden die set to cut out my Newton image, and the portholes die from the Slimline Frames and Portholes die set, to cut out the colored portion of each roundabout.  

I used foam tape to adhere the green glitter portholes panel to my card, and then placed the colored flower circles into the portholes adhering them with liquid glue.  I then used foam tape to adhere Newton and his flowers to my card!

For the sentiment, I cut a piece of white cardstock using a fishtail die from NND Banner Trio die set.  I then stamped the sentiment from NND Spring Roundabout in orange ink, also inking the sides of the banner, before adhering it to my card. 

Inky Paws Challenge Color Challenge - Newton's Flower Garden stamp and die set, Floral Roundabout, Spring Roundabout, Slimline Frames and Portholes die set, Banner Trio die set by Newton's Nook Designs #newtonsnook #handmade

Inky Paws Challenge Color Challenge - Newton's Flower Garden stamp and die set, Floral Roundabout, Spring Roundabout, Slimline Frames and Portholes die set, Banner Trio die set by Newton's Nook Designs #newtonsnook #handmade

Copic colors used for Newton:
  • Y17, Y38, YR15, N2
  • Nose - R11
  • Ears and Beans - R00, R11, R20
Orange Flowers:
  • YR20, YR12, YR14
  • Y000, Y02, Y08
Yellow Flowers:
  • Y000, Y02, Y06, Y08
  • Y23, Y26
White Flowers:
  • T0, T1
  • Y000, Y02, Y08
Leaves:
  • YG01, YG06, YG17
Inky Paws Challenge Color Challenge - Newton's Flower Garden stamp and die set, Floral Roundabout, Spring Roundabout, Slimline Frames and Portholes die set, Banner Trio die set by Newton's Nook Designs #newtonsnook #handmade

I finished up this card by adding glitter to a few of the flowers, and glossy accents on Newton's nose, beans, and the flower centers.  Now it's time to get your paws inky creating a project for the Color Challenge using your Newton's Nook Designs products.  Be sure to link up to the Inky Paws Challenge!  Hope to see you there!

Tuesday, April 13, 2021

Friendly Flowers Happy Birthday Card

 Hi everyone!  Today I am sharing a card I made for Simon Says Stamp Wednesday Challenge - Happy Birthday.  I couldn't wait to color these gorgeous flowers with my Zigs!


To start this card I stamped this beautiful floral image from SSS Friendly Flowers stamp set with embossing ink, and heat embossed it with the SSS Cream embossing powder that came in the April Card Kit.  I colored it with Zig Clean Color Real Brush Markers, and cut it out with the coordinating die.

I then decided on SSS Detail Swirls Plate for my background, and ran it through my die cutting machine with white cardstock.  I cut it down with the second largest die in Waffle Flower's A2 Layers die set, and attached it to a gold glitter cardbase.  

I then adhered my floral image with foam tape for dimension, and used a sentiment from SSS All Things Happy Sentiment Strips.  I am starting to really love these strips.  They are so convenient and look amazing!  


Zig colors used for Yellow Flowers:
  • Pale Yellow, Lemon Yellow, Yellow, Ochre
Lilies:
  • English Lavender, Pale Violet
Berries:
  • Pink Flamingo
Leaves:
  • Yellow Green, Light Green, Deep Green
  • Mid Green, Olive Green

I added some sparkling crystals for a finishing touch on this card.  Thank you and I hope you enjoyed my card today!

Monday, April 12, 2021

Inky Paws Challenge #146 - Color Challenge

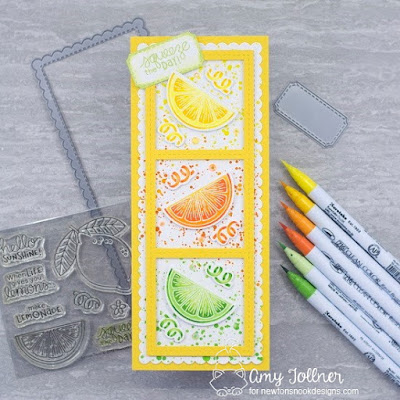
 Hi everyone!  This is Inky Paws Challenge #146 - Color Challenge.  The colors are Orange, Yellow, Green, and White.  You have until Friday, April 23rd to get your entries in and have a chance to win a $20 store credit to Newton's Nook Designs online shop!  When I saw the colors for this challenge I knew right away that I wanted to create a card with this stamp set!

Newton's Nook Designs Inky Paws Challenge - Color Challenge

Inky Paws Challenge Color Challenge - Lemon Twist stamp and die set, Slimline Frames and Portholes die set, Slimline Frames and Windows die set, Framework die set by Newton's Nook Designs #newtonsnook #handmade

To start this card I cut a yellow cardbase to 8.5" by 3.5".  I used the scalloped frame die in NND Slimline Frames and Portholes die set to cut a piece of smooth white cardstock.  I then used the windows frame die in NND Slimline Frames and Windows die set to cut another piece of yellow cardstock.  I used watercolor paints to splatter the challenge colors onto the scalloped white panel and set it aside to dry.  

Next, I stamped the images from NND Lemon Twist stamp set onto smooth white cardstock with embossing ink and clear heat embossed.  I colored the images with Zig Clean Color Real Brush Markers and cut them out with their coordinating dies

After my ink splattered panel was dry, I adhered it to the yellow cardbase, and adhered the yellow windows to the panel with foam tape.  I used foam tape to attach all of the fruit slices and zest images to my card.  

For the sentiment, I cut a piece of white cardstock using a die from NND Framework die set.  I stamped the sentiment in green ink, and inked the edges of the piece as well.  I attached it my card, carefully tucking it under a corner of the lemon slice.  

Inky Paws Challenge Color Challenge - Lemon Twist stamp and die set, Slimline Frames and Portholes die set, Slimline Frames and Windows die set, Framework die set by Newton's Nook Designs #newtonsnook #handmade

Inky Paws Challenge Color Challenge - Lemon Twist stamp and die set, Slimline Frames and Portholes die set, Slimline Frames and Windows die set, Framework die set by Newton's Nook Designs #newtonsnook #handmade

Zig colors used for Lemon:
  • Yellow, Lemon Yellow
Orange:
  • Orange, Bright Orange
Lime:
  • Light Green, Pale Green
Inky Paws Challenge Color Challenge - Lemon Twist stamp and die set, Slimline Frames and Portholes die set, Slimline Frames and Windows die set, Framework die set by Newton's Nook Designs #newtonsnook #handmade

All I did for finishing touches on this card is add a few color coordinating crystals in each window.  They are a little hard to see as they blend in with the ink splatters!  I had so much fun making this card, and love the way it came out!  Now it's time to get your paws inky creating a project for the Color Challenge using your Newton's Nook Designs products.  Be sure to link up to the Inky Paws Challenge!  Hope to see you there!

Sunday, April 11, 2021

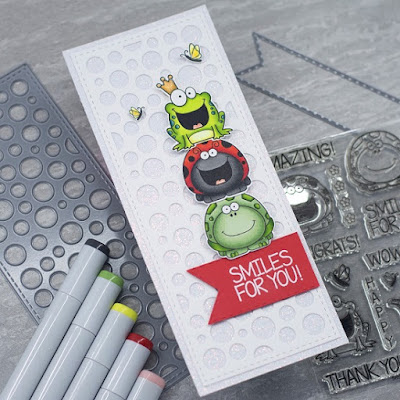
Smiles for You Slimline Card

 Hi everyone!  Today I am sharing a card a made for Your Next Stamp's Challenge #161 - Sunshine and Smiles.  These critters are just so cute and I couldn't wait to use them on this card!


I started this card by cutting a piece of white glitter cardstock to 8.5" by 3.5" for my cardbase.  I used YNS Slim Circle Panel die to cut a piece of plain white cardstock and glued it to my glitter base.  

Next, I stamped out these super adorable images from YNS Smiley Happy Critter Crew One stamp set, colored them with Copic markers, and cut them out with their coordinating dies.  I had so much fun coloring these critters!  They are so happy and fun, and I can't help but smile when I look at them!  

I used the largest die in YNS Stitched Fishtail Banner die set to cut a piece of red cardstock on which I white heat embossed the sentiment.  I then adhered the sentiment banner and all of the images to my card with foam squares for dimension!


Copic colors used for Frog:
  • YG01, YG23, YG25
  • Belly - Y0000, Y00, Y21
  • Spots - BG72, BG18
  • Tongue - E93
  • Crown - Y23, Y26, Y28
Ladybug:
  • R05, R24, R27, R46
  • T3, T4, T5, T7
  • Tongue - E93
Turtle:
  • YG61, G21, G24, YG63
  • YG03, YG25, YG17
Butterflies:
  • Y00, Y02, Y06, Y08
I did used T8 to go over the inside of the mouths of the frog and ladybug, and the ladybug's spots.


For finishing touches on this card I added glitter to the butterflies and crown, and glossy accents to the frog and ladybug's tongues!  Thank you and I hope you enjoyed my card today!

Thursday, April 8, 2021

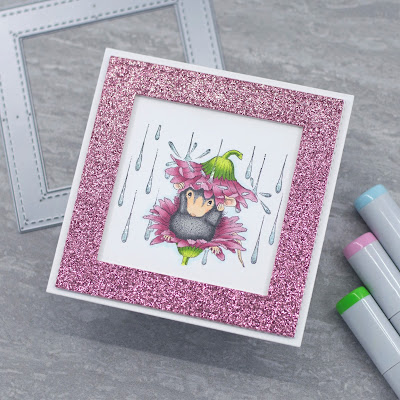
House Mouse Rain Flower

 Hi everyone!  Today I am sharing a card I created for the House Mouse and Friends Monday Challenge #337 - Anything Goes with the option of Easter/Spring.  Since I started on this card after Easter I went with the Spring theme.  I think this stamp goes perfectly with that because it always seems to be rainy in the Spring!


I kept this card really simple.  I cut a 4 1/4" by 4 1/4" cardbase out of Copic friendly white paper.  I then stamped the super adorable image of Monica taking shelter from the rain in a flower, and colored it with Copic markers.  

I used the largest die in Your Next Stamp's Stitched Square Frame die set to cut out the pink glitter frame.  I adhered it to my card with foam tape for some dimension.


Copic colors used for Monica:
  • Fur - T1, T3, T5
  • Skin - E50, E51
  • Ears, Cheeks, Nose - E93
Flower:
  • R81, R83, R85
  • YG01, YG03, YG17
Rain:
  • B0000, B000

For finishing touches on this card I added glitter to the raindrops, and glossy accents to Monica's nose and the raindrops as well!  Thank you and I hope you enjoyed my card today!

Monday, April 5, 2021

Inky Paws Challenge #145 - Friendship Theme Reminder

  Hi everybody!  This is an Inky Paws Challenge reminder post for Inky Paws Challenge #145 - Friendship Theme.  You have until Friday, April 9th to get your entries in and have a chance to win a $20 store credit to Newton's Nook Designs online shop!

Newton's Nook Designs Inky Paws Challenge - Friendship Theme

Inky Paws Challenge Friendship Theme - Puppy Pals stamp and die set, Heart Frames die set, Hills and Grass stencil, Clouds stencil, Newton's Birdbath stamp and die set, Newton's Valentine stamp and die set by Newton's Nook Designs #newtonsnook #handmade

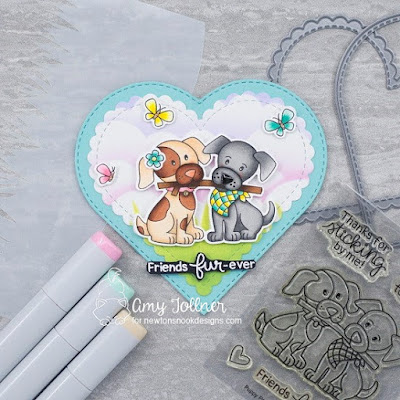
So when I started this card I knew what I wanted to do for a general design, but didn't make a solid decision on it yet.  I had originally used the largest die in NND Heart Frames die set to cut a piece of smooth white cardstock.  I used the Hills and Grass stencil with Distress Oxide Inks Twisted Citron and Mowed Lawn, and the Clouds stencil with Shaded Lilac and Kitsch Flamingo.  As I was trying to decide what I wanted to use as a cardbase, I thought, "why don't I just make a heart shaped card?! It goes great with the Friendship theme."  It was at that point I used the second largest die in the Heart Frames die set, which is the largest scalloped heart, and cut out my already started scene!  I then used the largest die in the Heart Frames die set again, this time to cut a piece of teal cardstock for my base.  I think the scallops are so gorgeous and just love how they look against the solid color heart cardbase!  

Next, I stamped this super adorable image from NND Puppy Pals stamp set, colored it with Copic markers, and cut it out with the coordinating die set.  I did the same with the butterflies from Newton's Birdbath stamp set, and the flower from Newton's Valentine stamp set.  I liquid glued the flower by the pup's ear, and adhered all of the images to my card with foam tape for dimension.  

I stamped the sentiment, which is from the Pupply Pals stamp set, on black cardstock and white heat embossed.  I fussy cut around the sentiment then attached it to my card with foam tape.

Inky Paws Challenge Friendship Theme - Puppy Pals stamp and die set, Heart Frames die set, Hills and Grass stencil, Clouds stencil, Newton's Birdbath stamp and die set, Newton's Valentine stamp and die set by Newton's Nook Designs #newtonsnook #handmade

Inky Paws Challenge Friendship Theme - Puppy Pals stamp and die set, Heart Frames die set, Hills and Grass stencil, Clouds stencil, Newton's Birdbath stamp and die set, Newton's Valentine stamp and die set by Newton's Nook Designs #newtonsnook #handmade

Inky Paws Challenge Friendship Theme - Puppy Pals stamp and die set, Heart Frames die set, Hills and Grass stencil, Clouds stencil, Newton's Birdbath stamp and die set, Newton's Valentine stamp and die set by Newton's Nook Designs #newtonsnook #handmade

Copic colors used for Tan Pup:
  • E50, E51, E53, N1
  • E13, E15, E25, N4
  • Nose - R12, R93
  • Cheeks - E93
  • Collar - RV10, RV21, RV13
Gray Pup:
  • T1, T2, T3, T4, T5
  • Nose - T6, T7, T8
  • Cheeks - E93
  • Scarf - Y000, Y06, Y08
    • BG11, BG32, BG15
Stick:
  • E55, E15, E57, E59
Butterflies:
  • RV10, RV21, RV13
  • Y000, Y06, Y08
  • BG11, BG32, BG15
  • Bodies - E11, E15
Flower:
  • BG11, BG32, BG15
  • Y000, Y08
Inky Paws Challenge Friendship Theme - Puppy Pals stamp and die set, Heart Frames die set, Hills and Grass stencil, Clouds stencil, Newton's Birdbath stamp and die set, Newton's Valentine stamp and die set by Newton's Nook Designs #newtonsnook #handmade

For finishing touches I added glitter to the pup's collar and flower.  I used gold glitter Stickles on the collar tag.  I also used glossy accents on the pup's noses, the butterfly's bodies, and the flower center.  Now it's time to get your paws inky creating a Friendship Theme project using your Newton's Nook Designs products!  Be sure to link up to the Inky Paws Challenge!  Hope to see you there!