Tuesday, March 30, 2021

Set of 4 Easter 4 Bar Cards

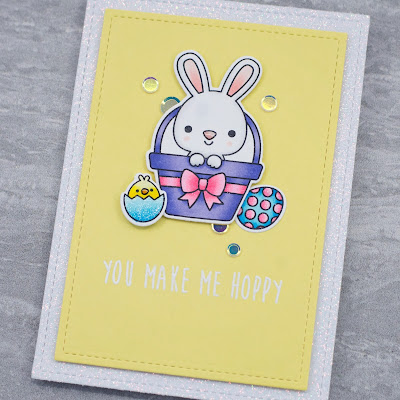
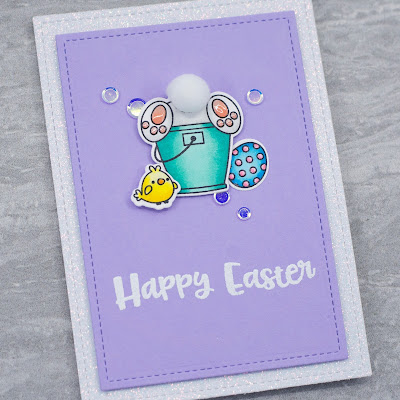
 Hi everyone!  Today I am sharing a set of 4 Easter 4 Bar cards that I created.  I am starting to fall in love with the 4 Bar size.  It is perfect for a little stamp and sentiment, and of course a few sequins!  It is so easy to make a set with this size so I hope to share more 4 Bar size sets in the future.  I am entering these into Simon Says Stamp Monday Challenge - Easter/Spring, and Simon Says Stamp Wednesday Challenge - Spring/Easter Mood Board featuring Lawn Fawn products.  


To start these cards off I used the largest die in Lawn Fawn's Large Stitched 4 Bar Rectangles die set to cut a white glitter cardbase for all 4 cards.  A 4 Bar card measures 3 1/2" by 4 7/8".  Next, I used the largest die in Lawn Fawn's Small Stitched 4 Bar Rectangles die set to cut the colored cardstocks.  

I stamped all of these images from SSS You Make Me Hoppy stamp set, colored them with Copic markers, and cut them out with their coordinating dies.  I white heat embossed the sentiments which are from the same stamp set.  I do wish the sentiment showed up a little better on the yellow cardstock, but I suppose yellow is a pretty light color to be putting white sentiments on anyway!  Next, I used foam tape to adhere the colored cardstocks to my cardbases.  I then added my images using a combination of liquid glue and foam tape of varying thickness to create dimension.


Copic colors used for Bunny:
  • T0, T1, T2
  • Ears, Nose, Beans - R00, R11, R20
  • Cheeks - R30
Flower:
  • RV10, RV21, RV13
  • Y00, Y08
Carrot:
  • YR12, YR14, YR16, YR07
  • YG01, YG06, YG17

Copic colors used for Bunny:
  • T0, T1, T2
  • Ears and Beans - R12, E93, R21
  • Nose - E93, R21
  • Cheeks - R30
Chicks:
  • Y000, Y00, Y06, Y08
  • Y38, YR04
Egg:
  • B000, B00, B01, B02

Copic colors used for Bunny:
  • T0, T1, T2
  • Ears and Nose - R00, R11, R21
  • Cheeks - R30
Basket:
  • BV00, BV01, BV02, BV13
Bow:
  • RV10, RV21, RV13
Chick in egg:
  • Y000, Y00, Y06, Y08
  • Y38, YR04
  • B000, B00, B01, B02
Polka dot egg:
  • B00, B02, B05
  • RV10, RV21, RV13

Copic colors used for Bunny:
  • T0, T1, T2
  • Beans - R12, E93, R21
Pail:
  • BG11, BG32, BG15
Chick:
  • Y000, Y00, Y06, Y08
  • Y38, YR04
Egg:
  • B00, B02, B05
  • RV10, RV21, RV13

To finish off these cards I added some glitter, glossy accents, sequins for added bling, and a pom-pom for the bunny's tail!  Thank you and I hope you enjoyed this set of 4 Bar cards today!

Monday, March 29, 2021

Inky Paws Challenge #145 - Friendship Theme

 Hi everyone!  A new Inky Paws Challenge starts today!  You have until Friday, April 9th to get your entries in and have a chance to win a $20 store credit to Newton's Nook Designs online shop!  This is Inky Paws Challenge #145 - Friendship Theme.  

Newton's Nook Designs Inky Paws Challenge - Friendship Theme

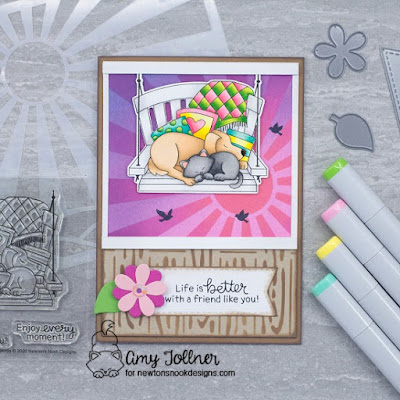
Inky Paws Challenge Friendship Theme - Porch Swing Friends stamp and die set, Serene Silhouettes stamp set, Sunscape stencil, Hardwood stencil, Frames and Flags die set, Slimline Frames and Portholes die set by Newton's Nook Designs #newtonsnook #handmade

I love sitting on my front porch watching the sun set.  The weather is getting a bit nicer here so hopefully I will be able to do that soon!  I immediately thought of this stamp for the Friendship Theme and wanted to create a great sunset to go with it.  I started by cutting a card base to A6 size, 4 1/2" by 6 1/4".  I then cut a piece of smooth white cardstock so I would have a 1/4" border.  I used purple tape to mask off the bottom portion of my paper.  I blended Distress Oxide Inks Faded Jeans, Dusty Concord, and Kitsch Flamingo for the background.  I then placed NND Sunscape stencil so it would look like the sun is setting and blended Distress Oxide Inks Seedless Preserves, Picked Raspberry, and Abandoned Coral. 

I measured the bottom section of my card and cut a piece of kraft cardstock to that size.  I used NND Hardwood stencil with Distress Oxide Inks Vintage Photo and Walnut Stain.  I used tape runner to adhere it to the bottom portion of my card creating a wood floor look.  To complete the porch window, I cut strips of white cardstock and adhered them to my card with liquid glue and foam tape, adhering one strip right over the seam where the window and floor meet.

Next, I stamped the absolutely adorable image, NND Porch Swing Friends, on Copic friendly white paper, colored it, and cut it out with the coordinating die.  I adhered the image to my card with foam tape, and stamped a few birds from NND Serene Silhouettes stamp set to complete the scene. 

I used the stitched banner die from NND Frames and Flags die set to cut a piece of white cardstock on which I stamped the sentiment in black pigment ink and clear heat embossed.  I inked the edges of the banner and the cardbase with Walnut Stain Distress Oxide Ink, and attached the banner to my card with liquid glue.  I wanted to add a little color to the bottom portion of my card so I die cut pink and green cardstock using the flower and leaf die from NND Slimline Frames and Portholes die set.  I adhered the flower to my card with foam tape and tucked the leaf in behind it.  For the center of the flower I used a large iridescent crystal for some sparkle!

Inky Paws Challenge Friendship Theme - Porch Swing Friends stamp and die set, Serene Silhouettes stamp set, Sunscape stencil, Hardwood stencil, Frames and Flags die set, Slimline Frames and Portholes die set by Newton's Nook Designs #newtonsnook #handmade

Inky Paws Challenge Friendship Theme - Porch Swing Friends stamp and die set, Serene Silhouettes stamp set, Sunscape stencil, Hardwood stencil, Frames and Flags die set, Slimline Frames and Portholes die set by Newton's Nook Designs #newtonsnook #handmade

Inky Paws Challenge Friendship Theme - Porch Swing Friends stamp and die set, Serene Silhouettes stamp set, Sunscape stencil, Hardwood stencil, Frames and Flags die set, Slimline Frames and Portholes die set by Newton's Nook Designs #newtonsnook #handmade

Copic colors used for Pup:
  • E50, E51, E53, E55
  • Nose - E57, E59
Kitty:
  • T1, T2, T3, T5, T6
  • Ears - R12, E93
  • Nose - R12
  • Cheeks - E93
Swing:
  • T0, T1, T2
Pink:
  • RV10, RV21, RV23, RV25
Yellow:
  • Y000, Y00, Y06, Y08
Green:
  • YG01, YG03, YG06, YG09
Teal:
  • BG10, BG11, BG23, BG15
Inky Paws Challenge Friendship Theme - Porch Swing Friends stamp and die set, Serene Silhouettes stamp set, Sunscape stencil, Hardwood stencil, Frames and Flags die set, Slimline Frames and Portholes die set by Newton's Nook Designs #newtonsnook #handmade

For finishing touches on this card I added glitter to the blanket and pillows and glossy accents to their cute noses!  Now it's time to get your paws inky creating a Friendship Theme project using your Newton's Nook Designs products!  Be sure to link up to the Inky Paws Challenge!  Hope to see you there!

Wednesday, March 24, 2021

Yes, You Can Coffee Card

 Hi everyone!  I am sharing a card I made for Your Next Stamp's Challenge #160 - Inspiration.  The photo features gray and pink colors which I used for my inspiration on this card!  This sentiment cracks me up because sometimes that is exactly how I feel!  Lol!!


To start off this card I cut a gray cardbase to A2 size.  I die cut pink cardstock with the largest die from My Favorite Things Wonky Stitched Rectangle die set.  I used Newton's Nook Designs Mugs stencil with Kitsch Flamingo Distress Oxide Ink on the pink cardstock to create an awesome background, and adhered it to my cardbase.  

Next, I die cut a circle out of smooth white cardstock using the second largest die in MFT Wonky Stitched Circle die set.  I used Distress Oxide Inks Spun Sugar and Kitsch Flamingo to add a little pink to the circle, which I adhered to my background with foam tape.  I then stamped this super cute image from Your Next Stamp's Coffee Characters stamp set, colored it with Copic markers, and cut it out with the coordinating die.  I adhered it to my circle with foam tape for more dimension.  

For the sentiment I die cut white cardstock using the second largest die in YNS Stitched Fishtail Banner die set.  After determining how much space I needed for the sentiment, I turned the die around to create a fishtail on the opposite end.  I stamped the sentiment in gray pigment ink and clear heat embossed.  I used Kitsch Flamingo again to ink the edges of the banner, and adhered it to my card with foam tape.


Copic colors used for Mouse:
  • T0, T1, T2, T3
  • Ears and Tail - R12, E93
  • Cheeks - E93
Cup:
  • RV000, RV00, RV02, T0, T1

I finished this card off by adding glitter to the cup, glossy accents to the mouse's nose and teeth, and YNS glittery Gumdrops from the Watermelon Party set.  Thank you and I hope you enjoyed my card today!

House Mouse Butterfly Ride

 Hi All!  Today I am sharing a card I created for the House Mouse and Friends Monday Challenge #336 - Anything Goes with the option of Bugs.  I love butterflies and was very happy to be able to use this stamp for this challenge! 


I started this card by die cutting a piece of Copic friendly white paper with the scalloped frame die from Newton's Nook Designs Frames and Flags die set.  I then stamped this beautiful butterfly image, Butterfly Ride, featuring Mudpie, and colored it with Copic Markers.  

To create the sky background, I used NND Clouds stencil with Distress Oxide Inks Tumbled Glass and Salty Ocean.  I was a little nervous, but worked slowly and carefully so I wouldn't mess up my image, and I am so happy with the way it came out! 

I decided on a textured blue shimmer cardstock for my base and adhered my colored piece with foam tape to give it a little dimension.


Copic colors used for Mudpie:
  • Fur - E21, E23, E25
  • Skin - E50, E51
  • Nose, Cheek, Ear - E93
Butterfly:
  • Wings - RV10, RV21, RV13, V12, BG10, YG11
  • Body - E11, E15, T4, T6


To finish off this card I added glitter to the butterfly's wings, and glossy accents to the butterfly's eye and Mudpie's nose.  Thank you and I hope you enjoyed my card today!

Tuesday, March 23, 2021

Doodlebug Happy Easter Card

 Hi everyone!  Today I am sharing a card I made for Simon Says Stamp Wednesday Challenge - Use 2 or More Patterned Papers featuring Doodlebug products.  I was lucky enough to order the SSS "You Make Me Hoppy" Limited Edition Card Kit before it sold out!  It contained many Doodlebug products, so I used some items from the kit to make this card.  


I first die cut a piece of smooth white cardstock with the second largest die in SSS Wonky Rectangle die set.  I used Newton's Nook Designs Clouds stencil with Distress Oxide Inks Tumbled Glass and Salty Ocean to create the sky.  I used the grass die from NND Land Borders die set to cut the grass out of patterned paper.  I adhered one layer of grass directly to my card, and another with foam tape.  

Since this challenge is showcasing Doodlebug products, I decided to use some of the Doodlebug Hippy Hoppity Mini Icon Stickers that came in the kit to create the scene.  The butterfly is one that I had colored for a previous project and did not use.  It is from NND Newton's Picnic stamp set.  

Once my scene was complete, I die cut the "Happy Easter" patterned paper using the largest die from SSS Stitched Rectangles die set.  I adhered it to a teal cardbase, then adhered my scene to the patterned paper.  


To finish off this card I added a little glitter and glossy accents to the butterfly.  Thank you and I hope you enjoyed my card today!

Monday, March 22, 2021

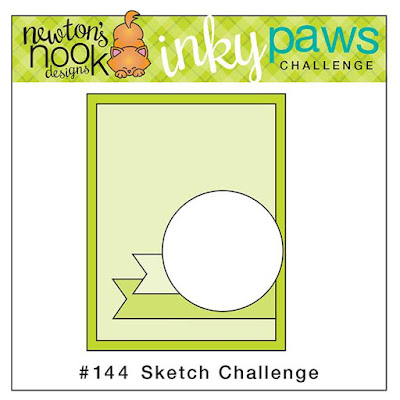
Inky Paws Challenge #144 - Sketch Challenge Reminder

 Hi everyone!  Don't forget you have until Friday, March 26th to get your entries into Newton's Nook Designs Inky Paws Challenge to have a chance to win a $20 store credit to Newton's Nook Designs online shop!  This is Inky Paws Challenge #144 - Sketch Challenge

Newton's Nook Designs Inky Paws Challenge - Sketch Challenge

Inky Paws Challenge Sketch Challenge - Newton's Peeps stamp and die set, Circle Frames die set, Frames and Flags die set, Basketweave stencil, Clouds stencil, Hills and Grass stencil by Newton's Nook Designs #newtonsnook #handmade

I started this card by cutting a piece of gold glitter cardstock to 5" x 7" for my cardbase.  Next, I cut a piece of smooth white cardstock to 4 3/4" x 6 3/4" and blended Distress Oxide Inks Squeezed Lemonade, Scattered Straw, Kitsch Flamingo, and Shaded Lilac.  I then used NND new Basketweave stencil with glitter paste on my ink blended panel and set it aside to dry.

I used the largest circle die in NND Circle Frames die set to cut a piece of smooth white cardstock.  To create the outdoor scene, I used NND Hills and Grass stencil with Distress Oxide Inks Twisted Citron and Mowed Lawn.  I then used NND Clouds stencil with Distress Oxide Inks Tumbled Glass and Salty Ocean.  I stamped the sentiment from NND Newton's Peeps stamp set in black pigment ink and clear heat embossed.  I stamped the super cute images of Newton and his Peeps, also from NND Newton's Peeps stamp set, colored them with Copic markers, and cut them out with their coordinating die set.  After adhering the images with foam tape, I decided to add a couple of butterflies from NND Newton's Birdbath stamp set.  I colored them, cut them out with their coordinating die set, and adhered them to my scene with foam tape as well.   

I used NND Frames and Flags die set to cut the yellow and pink banners, adhering them to my card with liquid glue.  I then attached the adorable scene to my card with foam tape for some dimension!

Inky Paws Challenge Sketch Challenge - Newton's Peeps stamp and die set, Circle Frames die set, Frames and Flags die set, Basketweave stencil, Clouds stencil, Hills and Grass stencil by Newton's Nook Designs #newtonsnook #handmade

Inky Paws Challenge Sketch Challenge - Newton's Peeps stamp and die set, Circle Frames die set, Frames and Flags die set, Basketweave stencil, Clouds stencil, Hills and Grass stencil by Newton's Nook Designs #newtonsnook #handmade

Inky Paws Challenge Sketch Challenge - Newton's Peeps stamp and die set, Circle Frames die set, Frames and Flags die set, Basketweave stencil, Clouds stencil, Hills and Grass stencil by Newton's Nook Designs #newtonsnook #handmade

Copic colors used for Newton:
  • YR0000, YR000, YR20, YR23, YR31 - stripes
  • Ears - R20, R32, R43
  • Nose - R32
  • Collar - B000, B01, B02, B05
Peeps:
  • Y000, Y11, Y13, Y15
  • RV00, RV10, RV21, RV13
  • V000, V01, V12, V04
  • Beaks - Y19, Y38
Basket:
  • Y21, Y26, YR23, E34, N1, N2, N3
  • BG10, BG11, BG23, BG13
Butterflies:
  • Y000, Y11, Y13, Y15
  • RV00, RV10, RV21, RV13
  • Bodies - E11, E15
Inky Paws Challenge Sketch Challenge - Newton's Peeps stamp and die set, Circle Frames die set, Frames and Flags die set, Basketweave stencil, Clouds stencil, Hills and Grass stencil by Newton's Nook Designs #newtonsnook #handmade

For finishing touches on this card I added glitter to Newton's collar, and the bow and lace on the basket with a glitter pen.  I also added glossy accents to Newton's nose, the Peep's beaks, and butterfly bodies.  I used gold glitter Stickles on the tag on Newton's collar.  Now it's time to get your paws inky creating a project for the Sketch Challenge using your Newton's Nook Designs products.  Be sure to link up to the Inky Paws Challenge!  Hope to see you there!

Monday, March 15, 2021

Inky Paws Challenge #144 - Sketch Challenge

 Hi everyone!  This is Inky Paws Challenge #144 - Sketch Challenge.  You have until Friday, March 26th to get your entries in and have a chance to win a $20 store credit to Newton's Nook Designs online shop!  St. Patrick's Day is Wednesday, and I was so excited to create this card and use this adorable stamp set!

Newton's Nook Designs Inky Paws Challenge - Sketch Challenge
Inky Paws Challenge Sketch Challenge - Newton's Pot of Gold stamp set, Circle Frames die set, Frames and Flags die set by Newton's Nook Designs #newtonsnook #handmade

To start this card I cut green glitter cardstock to A2 size for a cardbase.  I used the scalloped frame die from NND Frames and Flags die set to cut the patterned paper, and adhered it to my cardbase.  I used one of the banner dies, also from NND Frames and Flags die set, to cut the green glitter and gold glitter banners. 

Next, I used NND Circle Frames die set to cut a piece of smooth white cardstock.  I stamped this super cute image from NND Newton's Pot of Gold stamp set with black pigment ink and clear heat embossed.  I used Nuvo Golden Sparkler Shimmer Powder mixed with water on the coins and hat buckle.  I used Zig Clean Color Real Brush markers to color the rest of my image.  I then mixed Nuvo Falling Leaves Shimmer Powder with water, covered my image, and flicked it onto the background of the circle.  After everything was dry, I stamped and gold heat embossed the "Happy St. Patrick's Day" sentiment, also from NND Newton's Pot of Gold stamp set.  I then used foam tape to pop up the circle for some dimension!  

Inky Paws Challenge Sketch Challenge - Newton's Pot of Gold stamp set, Circle Frames die set, Frames and Flags die set by Newton's Nook Designs #newtonsnook #handmade

Inky Paws Challenge Sketch Challenge - Newton's Pot of Gold stamp set, Circle Frames die set, Frames and Flags die set by Newton's Nook Designs #newtonsnook #handmade

Inky Paws Challenge Sketch Challenge - Newton's Pot of Gold stamp set, Circle Frames die set, Frames and Flags die set by Newton's Nook Designs #newtonsnook #handmade

Colors used for Newton:
  • Pale Orange, Mustard
  • Nose and Ears - Tea Rose
  • Chest - Warm Gray 2
Shamrock and Hat:
  • May Green, Green
Pot:
  • Gray, Dark Gray
Inky Paws Challenge Sketch Challenge - Newton's Pot of Gold stamp set, Circle Frames die set, Frames and Flags die set by Newton's Nook Designs #newtonsnook #handmade

For finishing touches on this card I added glossy accents to Newton's nose, hat buckle, and coins.  I also added a few green crystals for extra sparkle!  Now it's time to get your paws inky creating a project for the Sketch Challenge using your Newton's Nook Designs products.  Be sure to link up to the Inky Paws Challenge!  Hope to see you there!

Wednesday, March 10, 2021

House Mouse Perspective is Everything!

 Hi All!  Today I am sharing a card I made for the House Mouse and Friends Monday Challenge #335 - Anything Goes with the option of Geometric Shapes.  The shapes I used are diamonds and an oval.  I love the sentiment that came with this stamp and just had to use it!


I started this card by die cutting a piece of smooth white cardstock with the Quilted Frame die from Avery Elle.  I removed the oval center and blended Distress Oxide Inks Squeezed Lemonade, Scattered Straw, and Kitsch Flamingo.  After ink blending, I splattered some gold watercolor paint onto my piece.  

I knew I wanted to use my Copics so I die cut a piece of Copic friendly white paper with the same Quilted Frame die.  I removed the oval and stamped this super adorable House Mouse image from the House Mouse Mini Clear Set - Everyday, and colored it with my markers. 

With the coloring complete, I gold heat embossed the sentiment.  I adhered the ink blended piece to a gold glitter cardbase with foam tape, and adhered the oval in the center with liquid glue so the ink blended piece would be popped up, framing the cute mouse image!   


Copic colors used for Mouse:
  • Fur - E53, E35, E57
  • Skin - E50, E51
  • Ears, Cheeks, Nose - E93
Shadow around Mouse:
  • N1

All I did for a finishing touch on this card was to add glossy accents to the mouse's cute little nose!  Thank you and I hope you enjoyed my card today!

Tuesday, March 9, 2021

Floral Frame Hello Card

 Hi everyone!  Today I am sharing a card I created for Simon Says Stamp Wednesday Challenge - Beautiful Blossoms.  I am so happy I finally used this stamp!  It is Floral Frame from Stamptember 2019 Simon Says Stamp and Studio Katia collaboration!  


I started this card by die cutting a piece of white cardstock with the largest die from SSS Stitched Rectangles die set.  I then stamped SSS Wood Planks background stamp in silver ink on the white cardstock.  

I stamped out the gorgeous floral image, colored it with Copic markers, and cut it out with the coordinating die.  After coloring the flowers, I was able to choose a matching color for my cardbase which I adhered my Wood Plank background to.  I popped up the flower image with foam tape for some dimension.  

I used a "hello" die, which I believe may have come in a SSS Monthly Kit at some point, to die cut the sentiment.  I cut the sentiment out three times, adhering each layer together with liquid glue, and attached it to my card.  


Copic colors used for Flowers:
  • B41, B21, B63, BV13, BV17
  • Y11, Y13, Y15, Y28
Leaves:
  • YG01, YG03, YG06, YG17
  • G21, G24, G94, G99

For finishing touches on this card I added glitter to my sentiment, glossy accents to the flower centers, and a few raindrop crystals.  Thank you and I hope you enjoyed my card today!

Monday, March 8, 2021

Inky Paws Challenge #143 - Color Challenge Reminder

  Hi everybody!  Don't forget you have until Friday, March 12th to get your entries into Newton's Nook Designs Inky Paws Challenge to have a chance to win a $20 store credit to Newton's Nook Designs online shop!  This is Inky Paws Challenge #143 - Color Challenge.  The colors are Yellow, Purple, White and Spring Green!

Newton's Nook Designs Inky Paws Challenge - Color Challenge

Inky Paws Challenge Color Challenge - Hop Into Spring stamp and die set, Bitty Bunnies stamp and die set, Woodland Spring stamp and die set, Slimline Frames and Portholes die set, Slimline Frames and Windows die set by Newton's Nook Designs #newtonsnook #handmade

To start this card I cut a piece of light green glitter cardstock to 8.5" by 3.5" for a slimline cardbase.  I used the scalloped frame die from NND Slimline Frames and Portholes die set to cut a piece of purple speckled cardstock.  I then used the windows die from NND Slimline Frames and Windows die set to cut another piece of light green glitter cardstock.  I used liquid glue to adhere the purple speckled cardstock to the cardbase, and thin foam tape to adhere the glitter windows.  

I stamped out the adorable images from NND Hop Into Spring and Bitty Bunnies stamp sets.  I also stamped out two little flowers from NND Woodland Spring stamp set.  I stamped all of the images in gray pigment ink and clear heat embossed.  I used my Zig Clean Color Real Brush markers to color the images.  I really want to get into using them more often since our Use Watercolors challenge!  I then used the Hop Into Spring die setBitty Bunnies die set, and Woodland Spring die set to cut out my images.  I used foam tape to give some dimension and adhere the images to my card.

For the sentiment I cut a piece of white cardstock using a die from NND Framework die set.  I stamped the "hoppy Easter" sentiment from the Hop Into Spring stamp set in purple ink, also inking the edges of the sentiment piece, and adhered it to my card with foam tape as well.

Inky Paws Challenge Color Challenge - Hop Into Spring stamp and die set, Bitty Bunnies stamp and die set, Woodland Spring stamp and die set, Slimline Frames and Portholes die set, Slimline Frames and Windows die set by Newton's Nook Designs #newtonsnook #handmade

Inky Paws Challenge Color Challenge - Hop Into Spring stamp and die set, Bitty Bunnies stamp and die set, Woodland Spring stamp and die set, Slimline Frames and Portholes die set, Slimline Frames and Windows die set by Newton's Nook Designs #newtonsnook #handmade

Inky Paws Challenge Color Challenge - Hop Into Spring stamp and die set, Bitty Bunnies stamp and die set, Woodland Spring stamp and die set, Slimline Frames and Portholes die set, Slimline Frames and Windows die set by Newton's Nook Designs #newtonsnook #handmade

Inky Paws Challenge Color Challenge - Hop Into Spring stamp and die set, Bitty Bunnies stamp and die set, Woodland Spring stamp and die set, Slimline Frames and Portholes die set, Slimline Frames and Windows die set by Newton's Nook Designs #newtonsnook #handmade

Colors used for Bunnies:
  • Shadows - Pale Gray
  • Noses and Ears - Tea Rose
Yellow:
  • Lemon Yellow, Yellow
Purple:
  • Pale Violet, Lilac, Violet
Green:
  • Pale Green, Light Green
Inky Paws Challenge Color Challenge - Hop Into Spring stamp and die set, Bitty Bunnies stamp and die set, Woodland Spring stamp and die set, Slimline Frames and Portholes die set, Slimline Frames and Windows die set by Newton's Nook Designs #newtonsnook #handmade

To finish off this card I added glossy accents to the bunnies' noses, butterfly bodies, and flower centers.  Now it's time to get your paws inky creating a project for the Color Challenge using your Newton's Nook Designs products.  Make sure to link up to the Inky Paws Challenge!  Hope to see you there!