Wednesday, September 30, 2020

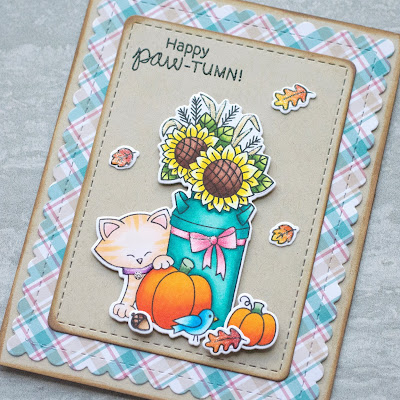
Newton's Nook Designs Happy Paw-tumn!

 Hi everybody!  Today I am sharing a card I made for Newton's Nook Designs Inky Paws Challenge #133 - Autumn Theme.  This Newton stamp is so cute and I just had to color it!


To start this card I cut a piece of Kraft card stock to an A2 size card and inked the edges with Vintage Photo Distress Oxide Ink.  I used the scalloped rectangle die from NND Frames and Flags die set to cut the patterned paper.  I then cut another piece of Kraft card stock using the stitched rectangle die, also in NND Frames and Flags die set, and inked the edges using the same Vintage Photo Distress Oxide Ink.

Next, I stamped the super cute Paw-tumn Newton image, along with the pumpkin, leaves, and acorn, from the same set, onto Copic friendly white paper.  After coloring, I cut all of the images out with their coordinating dies.  I stamped the sentiment in black pigment ink and clear heat embossed for a shiny look!  I then adhered all of my images with liquid glue and foam tape.  


Copic colors used for Newton:
  • YR0000, YR000, YR20, YR31 - stripes
  • Nose - R11
  • Ears - R00, R11, R20
  • Collar - V04, V05, V06, V09
Milkcan:
  • BG11, BG23, BG13, BG49
  • Bow - RV10, RV21, RV23, RV25
Sunflowers:
  • Y000, Y02, Y06, Y08
  • E11, E13, E15, E18
  • Leaves - YG01, YG03, YG17, YG67
    • Y21, Y23, Y26, Y28
Pumpkins:
  • Y17, YR04, YR07, YR09
  • G21, G24, G28
Bird:
  • B000, B01, B02, B04
  • Y02, Y17
Acorn:
  • E11, E13, E15, E18
  • E51, E53, E55, E57
Leaves:
  • Y08, Y17, YR04, YR07
  • YR04, YR07, YR09, R05, R27, R46

For finishing touches on this card I added glitter with a glitter pen, glossy accents, and silver glitter Stickles to the tag on Newton's collar!  Thank you and I hope you enjoyed my card today!

Your Next Stamp Autumn Wreath

Hello everybody!  Today I am sharing a card I made for Your Next Stamp Challenge #148 - Fall Festival.  


I started this card by cutting the Autumn orange glitter card stock to an A2 size card, and used the second largest die in the Your Next Stamp Stitched Rectangle die set to cut the white background.  I inked the edges of the white background with Spiced Marmalade Distress Oxide Ink.

Next, I stamped one of the adorable wreath images from the YNS Autumn Wreath stamp set and colored it with Copic markers.  After coloring, I cut it out with coordinating die, and then placed it on the background to see where I wanted to stamp the sentiment.  I stamped the sentiment with brown pigment ink and clear heat embossed.  I then popped the wreath up on foam tape for some dimension!


Copic colors used on Pumpkins:
  • Y17, YR04, YR07, YR09
  • G21, G24, G28
Leaves and Vines:
  • YG01, YG03, YG17, YG67
  • G21, G24, G94, G99
Critters: 
  • E11, E13, E15, E18
  • Ears and Nose - E93

To finish off this card I added glitter to the leaves, glossy accents to the noses, and a few orange crystals for added sparkle!  Thank you and I hope you enjoyed my card today!

Wednesday, September 23, 2020

House Mouse Designs - For you, my Friend

Hello everyone!  Today I am sharing a card I made for the House Mouse and Friends Monday Challenge #324 - Anything Goes with the option of Birds.  I am also entering this card into Simon Says Stamp Wednesday Challenge - Animal Antics.


I started this card by die cutting the patterned paper with the largest stitched square die from Newton's Nook Designs Frames Squared die set.  I then used the scalloped square die from the same set to die cut the solid light blue card stock.  Next, I die cut a piece of Copic friendly white paper with the smaller stitched square die still from NND Frames Squared die set.  I stamped the super cute images from the House Mouse Designs Mini Clear Stamp Set and colored them with Copic markers.  Then, I stamped the sentiment with black pigment ink and clear heat embossed it for a shiny look!  


Copic colors used for Mouse:
  • Fur - E53, E35, E57
  • Skin - E50, E51
  • Ear, Nose, Cheek - E93
  • Shadow - N1, N3, N5
Flower:
  • RV10, RV13, RV14, RV25
  • YG01, YG03, YG17
Hummingbird:
  • YG01, YG03, YG17
  • RV10, RV21, RV23, RV25
  • BG000, BG01, BG05, BG07

For finishing touches on this card I added glitter to the flower and hummingbird wings, and a few color coordinating crystals for extra sparkle!  Thank you and I hope you enjoyed my card today!

Newton's Nook Designs Season's Greetings

 Hi everyone!  Today I am sharing a very glittery card I made for Newton's Nook Designs Inky Paws Challenge #132 - Sketch Challenge.  I just purchased the Poinsettia Blooms stamp set, and even though Christmas is still a few months away, I wanted to try it out for this card!

I knew exactly what I wanted this card to look like so I started by die cutting all of the pieces I was going to use.  I first trimmed down a piece of gold glitter card stock to an A2 size card.  Then I used the scalloped frame from NND Frames and Flags die set to die cut red glitter card stock. Next, I die cut a piece of white card stock using the stitched rectangle die also from the NND Frames and Flags die set, and finally I cut out two banners using a die from the same die set.  I die cut one banner out of the gold glitter card stock I used as my card base, and one out of the red glitter card stock. 

Next, I stamped one of the beautiful poinsettia images from NND Poinsettia Blooms stamp set in gray ink, and colored it with Copic markers.  I left the stamp in place in my stamp positioning tool because after I was finished with my coloring, I re-stamped the image with embossing ink and gold heat embossed the image.  I then cut it out with the coordinating die.  

After gold heat embossing the sentiment, I used liquid glue to adhere the card layers together.  I used liquid glue to attach the gold glitter banner, and thin foam squares to attach the red glitter banner.  I then used foam tape to pop up the poinsettia image for some dimension!


Copic colors used:
  • R05, R24, R46, R39
  • YG03, YG17, YG67
  • G21, G24, G94, G99
  • Y13, Y15

Since this card is so glittery already, all I did to finish it off was add a few pieces of gold confetti.  Thank you and I hope you enjoyed my sparkly Christmas card today!

Tuesday, September 22, 2020

Newton's Nook Designs Harvest Happiness

Hi everybody!  This is my second post for today.  I am sharing another card I made for Newton's Nook Designs Inky Paws Challenge #132 - Sketch Challenge. 


I started this card by die cutting a piece of white card stock using the stitched rectangle die from NND Frames and Flags die set.  I then used NND Pumpkin Patch stencil along with one of my favorite craft supplies, glitter paste!  The white card stock with white glitter pumpkins came out gorgeous!  I then stamped the adorable deer image from NND Harvest Tails stamp set, and some leaves from NND Autumn Newton stamp set onto Copic friendly white paper.  I colored them with Copic markers and cut them out with their coordinating dies.  

Next, I cut out two banners using a die from NND Frames and Flags die set.  I die cut one out of the autumn orange glitter card stock I used as my card base, and one out of regular white card stock so I could use it for the sentiment.  I stamped the sentiment in brown pigment ink, and clear heat embossed for a shiny look!  I then used Tea Dye and Spiced Marmalade Distress Oxide Inks to ink the edges of the sentiment banner.

I adhered the glitter banner with liquid glue, and the sentiment banner with thin foam squares.  I then adhered the rest of my images with regular foam tape for dimension!    


Copic colors used for Deer:
  • E31, E33, E35, E37
  • E50, E51, E53
  • Ear and Nose - R00, R11, R20
  • Cheek - E93
  • Tail - W0, W1
  • Hooves - C1, C5, C7
Pumpkins:
  • Y17, YR04, YR07, YR09
  • G21, G24, G28
Wagon:
  • R05, R27, R46, R39
  • C1, C3, C5, C7
  • E50, E51, E53
Leaves:
  • Y11, Y13, Y15, Y17
  • YR15, YR07, YR09, R27
  • R05, R27, R46, R39

To finish off this card I added few accents with a white gel pen, glitter to the leaves, and glossy accents to the deer's nose!  Thank you and I hope you enjoyed my card!

Newton's Nook Designs Lovely Blooms

 Hello everyone!  Today I am sharing a card I made for Newton's Nook Designs Inky Paws Challenge #132 - Sketch Challenge.  I finally purchased the Lovely Blooms stamp set, and was so excited I was able to use it for this challenge!


To start this card, I die cut the scalloped frame from NND Frames and Flags die set out of white card stock.  I blended Distress Oxide Inks Tumbled Glass, Salty Ocean, and Blueprint Sketch making a gorgeous blue background!  I then added a tiny bit of water to some white gouache and flicked it onto the background.  Setting the background aside to dry, I stamped out the beautiful images from NND Lovely Blooms stamp set.  I colored them with Copic markers and cut them out with their coordinating dies. 

Next, I cut out two banners using a die from NND Frames and Flags die set.  I die cut one out of the same white glitter card stock I used as my card base, and one out of regular white card stock so I could use it for the sentiment.  I stamped the sentiment in black pigment ink, and clear heat embossed for some shine!  I then used Salty Ocean Distress Oxide Ink to ink the edges of the sentiment banner.  

It took a little time to figure out the placement for all of the images, but once I had an arrangement I liked, I used liquid glue, thin foam squares, and regular foam squares to adhere all of the images.  I adhered the glitter banner with liquid glue, and the sentiment banner with thin foam squares.  


Copic colors used:
  • V01, V04, V05, V06, V09
  • R81, R83, R85, R89
  • Y000, Y11, Y13, Y15
  • YG01, YG03, YG17, YG67
  • G21, G24, G94, G99
  • BG0000, BG000, BG01
  • G21, G24, G94, YG67, BG000
The last color combo I used on the flower stems.  I applied the BG000 over the other colors to make it look like they were in the glass jar.  


I finished off this card with glitter Stickles for the Hydrangea centers, a couple spots of glossy accents, and a few raindrop crystals!  Thank you and I hope you enjoyed my card today!

Wednesday, September 16, 2020

MFT 2020 Card Design Superstar - Innovation Category

 Hello everybody!  Here is my last post for tonight!  For my entry into the My Favorite Things 2020 Card Design Superstar Innovation category I created a slimline Polaroid shaker card!


I started this card by stamping three of the super fun images from MFT Picture Perfect Party Animals stamp set onto Copic friendly white paper.  I just love this stamp set!  All of the animals are having such a great time!  After coloring my images with Copic markers, and adding glitter to all of the balloons and more with a glitter pen, I made shaker windows using the MFT Square Shaker Pouches.  Boy, they sure make life so much easier when making shaker cards!  I then die cut three Polaroid picture frames out of white card stock using the MFT Polaroid Shaker Frame Die-namics.  Next, I stamped the sentiment onto one of the frames with black pigment ink and clear heat embossed for a shiny look!  I then adhered the frames to my shaker pouches with liquid glue.  

Teal is one of my favorite colors so I knew I wanted to use it for the card base!  I cut the teal card stock to 8 1/2" by 3 1/2" and inked the edges with Peacock Feathers Distress Oxide Ink.  For some dimension, I used foam tape to pop up the Polaroid shaker pouches from my card base!


Copic colors used for Elephant:
  • N1, N3, N5
  • BG11, BG23, BG13, BG49
  • YG01, YG03, YG06, YG09
  • RV10, RV21, RV23, RV25
  • Y11, Y13, Y15, Y08
  • Y17, YR04, YR07, YR09
Parrots:
  • B00, B01, B02, B04
  • YG01, YG03, YG06, YG09
  • RV10, RV21, RV23, RV25
  • Y11, Y13, Y15, Y08
  • Beaks - Y06, Y08, Y35, Y17
    • Y17, YR04, YR07
  • V01, V12, V04, V17
Giraffe:
  • YR20, Y23, YR23
  • E13, E15, E25
  • Ear - E93, R20
  • R05, R24, R46, R39
  • Y17, YR04, YR07, YR09
  • Y00, Y02, Y06, Y08
  • YG01, YG03, YG06, YG09
  • B00, B01, B02, B04
  • BV31, BV01, BV02, BV04
  • V01, V12, V04, V17
  • BG11, BG23, BG13, BG49
  • C0, C1, C3

To finish up this card, I added matching teal crystals for extra bling!  Thank you and I hope you enjoyed my slimline Polaroid shaker card!

MFT 2020 Card Design Superstar - Coloring Category

 Hi everyone!  Here is my second card for today and my entry into the My Favorite Things 2020 Card Design Superstar Coloring category.


For the background I used Distressed Oxide Inks Wilted Violet, Blueprint Sketch, and Black Soot.  I then mixed a tiny bit of water with white gouache and flicked it onto my card.  I set that aside to dry, and die cut black card stock using MFT Slimline Grassy Hills Die-namics, and MFT Spooky Fence Die-namics. I adhered the fence and one layer of grass with liquid glue.  I then used foam tape to pop up another grassy hill layer.  

I stamped the super cute mouse, bunny, and spooky house from the MFT Spooktacular Friends stamp set and colored them with Copic markers.  I just love these adorable images!  After coloring, I cut them out with their coordinating dies.  I also stamped and die cut the moon and star from the MFT Halloween Hoo set.  I die cut a black banner using MFT Skinny Strips Die-namics on which I stamped and white heat embossed my sentiment.  I attached my images using liquid glue and foam tape.


Copic colors used for House:
  • BG11, BG23, BG13, BG49
  • E31, E35, E57, E59
  • Y000, Y02, Y08, Y17
  • C3, C5, C7
Mouse:
  • T0, T1, T3, T5
  • Ears - R00, R11, R20
  • Cheeks - E93
  • Y17, YR04, YR07, YR09
  • G21, G24, G28
  • V01, V04, V17
  • BG11, BG23, BG49
Bunny:
  • E50, E51, E53
  • Ears - R00, R11, R20
  • Cheeks - E93
  • Tail - C0, C1
  • V01, V12, V04, V17
  • Y17, YR04, YR07, YR09
Moon and Star:
  • Y000, Y02, Y06, Y08

Since this card is for the Coloring category I didn't want to mess with it by adding glitter like I usually do!  I actually just left my coloring alone this time!  Thank you and I hope you enjoyed this Halloween card!

MFT 2020 Card Design Superstar - Clean and Simple

 Hi All!  This is my first of three posts today, as I have completed all of my entries for the My Favorite Things 2020 Card Design Superstar.  Here is my card for the Clean and Simple category.


For this card I used the largest of the MFT Wonky Stitched Rectangle Die-namics to cut out the blue card stock, and the second largest to die cut Copic friendly white paper.  Since this is a clean and simple design, I stamped the adorable penguin from the MFT Sending Sweet Celebration Wishes stamp set right onto my die cut rectangle.  I know he's a penguin, but I really wanted to color him blue!  I colored my image with Copic markers, and stamped the sentiment in black pigment ink, then clear heat embossed for some shine!  I then popped up the rectangle with colored image on foam tape for a little dimension!


Copic colors used:
  • B0000, B000, B00, B01, B04
  • BV31, BV02, BV04
  • YR0000, R02, R22
  • Y000, Y02, Y08, Y17
  • C0, C1, C2
  • E93

To finish off this card I added just a few iridescent crystals for some sparkle!  I hope you enjoyed my clean and simple card today!